Force Fields#
The Force Fields extension provides several methods that apply forces to the physics objects in the scene causing them to move in interesting ways. These methods, called force fields, can be added on top of each other to generate new behaviors. Each force field can be positioned, oriented and animated in the world to achieve the desired effect.
Getting Started#
The PhysX Force Fields extension (omni.physx.forcefields) requires that the USD Force Field Schema (omni.usd.schema.forcefield) be enabled first. To enable both extensions, open the Extension Manager using the Window > Extensions menu item. Enter “force” into the search box to find the two extensions. The USD Force Field Schema must be auto loaded when Kit launches because the PhysX Force Fields extension depends on it. Click on the USD Force Field Schema and then check the Autoload check box. Next exit Kit using the File > Exit command and then relaunch it.
Re-open the Extension Manager, find the PhysX Force Fields extension and then check the Autoload check box, if it should be active every time Kit is launched, or slide the enabled switch to on to only use it temporarily.
Introduction to Force Fields#
A force field is a mathematical function that computes a force vector to apply to a physics object as a function of time and its position, orientation, velocity and angular rate. The force fields are programmed and compiled in C++ because they are intended to act on very large numbers of objects and must execute very quickly. The current list of force fields include: Spherical, Planar, Linear, Drag, Wind and Noise. Additional force fields will be released in later versions.
These basic force fields are applied to a prim in the scene. Ideally, an Xform prim will be used so it can be positioned and oriented on the stage through its transformation matrix, but this is not required. Each force field does include a Position property that can be set, instead. However, the transform matrix takes precedence if both are available.
Multiple force fields can be applied to a single prim and multiple force fields can act on the physics objects. The forces are simply added together to determine the net force acting on it.
By default, force fields act on all of the physics objects in the scene. But this can be changed by editing the USD Collection to include or exclude prims and their children.
Demos#
The Force Fields extension provides a few sample scenes that can be loaded quickly to see how force fields can be used. Open the Physics Demo Scenes: Window > Simulation > Demo Scenes In the Physics Demo Scenes Tab, click on the Demos list to find the force field samples, which all start with the, “ForceField” prefix.
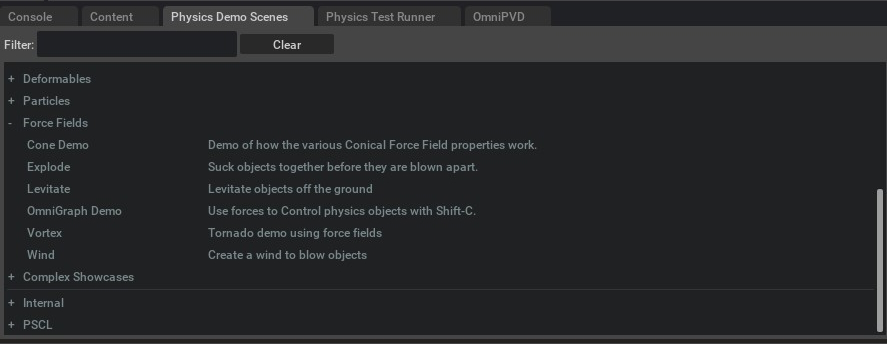
For the purposes of this introduction, select the ForceFieldExplode sample and click Load scene.
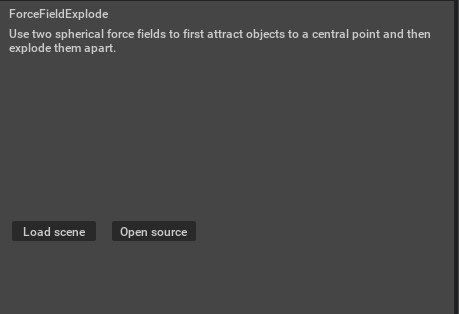
Press the Play button to start the simulation and watch the demonstration.
The following Python script is used to set up the force fields used in this demo and then animate their Enabled flags to achieve this result. An explanation of this script, how to programmatically set up force fields, which physics objects they affect and how to animate them is presented in Using Force Fields In Python
  1 import math
  2 import os
  3 import random
  4
  5 from pxr import Gf, Sdf, Usd
  6 from pxr import UsdGeom, UsdUtils, UsdPhysics
  7 from pxr import PhysxSchema, PhysicsSchemaTools, ForceFieldSchema
  8
  9 import omni.physx.scripts.physicsUtils as physicsUtils
 10 import omni.kit
 11
 12 import omni.physxdemos as demo
 13
 14
 15 class ExplodeForceFieldDemo(demo.Base):
 16     title = "ForceFieldExplode"
 17     category = demo.Categories.DEMOS
 18     short_description = "Suck objects together before they are blown apart."
 19     description = "Use two spherical force fields to first attract objects to a central point and then explode them apart."
 20
 21     def create(self, stage):
 22         numberOfBoxes = 20
 23         boxSpacing = 2
 24         boxPathName = "/box"
 25         groundPathName = "/ground"
 26         scenePathName = "/World/scene"
 27         explodePathName = "/World/explode"
 28
 29         # Physics scene
 30         up = Gf.Vec3f(0.0)
 31         up[1] = 1.0
 32         gravityDirection = -up
 33         gravityMagnitude = 1000.0
 34         forceRange = Gf.Vec2f(-1.0)
 35         center = Gf.Vec3f(0.0)
 36         center[1] = 400.0
 37
 38         scene = UsdPhysics.Scene.Define(stage, scenePathName)
 39         scene.CreateGravityDirectionAttr(gravityDirection)
 40         scene.CreateGravityMagnitudeAttr(gravityMagnitude)
 41
 42         # Plane
 43         physicsUtils.add_ground_plane(stage, groundPathName, "Y", 750.0, Gf.Vec3f(0.0), Gf.Vec3f(0.5))
 44
 45         # Create the force field prim
 46         xformPrim = UsdGeom.Xform.Define(stage, explodePathName)
 47         xformPrim.AddTranslateOp().Set(Gf.Vec3f(0.0, 300.0, 0.0))
 48         explodePrim = xformPrim.GetPrim()
 49
 50         suckPrimApi = ForceFieldSchema.PhysxForceFieldSphericalAPI.Apply(explodePrim, "Suck")
 51         suckPrimApi.CreateConstantAttr(-1e10)
 52         suckPrimApi.CreateLinearAttr(0.0)
 53         suckPrimApi.CreateInverseSquareAttr(0.0)
 54         suckPrimApi.CreateEnabledAttr(False)
 55         suckPrimApi.CreatePositionAttr(Gf.Vec3f(0.0, 0.0, 0.0))
 56         suckPrimApi.CreateRangeAttr(Gf.Vec2f(-1.0, -1.0))
 57
 58         explodePrimApi = ForceFieldSchema.PhysxForceFieldSphericalAPI.Apply(explodePrim, "Explode")
 59         explodePrimApi.CreateConstantAttr(4e10)
 60         explodePrimApi.CreateLinearAttr(0.0)
 61         explodePrimApi.CreateInverseSquareAttr(0.0)
 62         explodePrimApi.CreateEnabledAttr(False)
 63         explodePrimApi.CreatePositionAttr(Gf.Vec3f(0.0, 0.0, 0.0))
 64         explodePrimApi.CreateRangeAttr(Gf.Vec2f(-1.0, -1.0))
 65
 66         dragPrimApi = ForceFieldSchema.PhysxForceFieldDragAPI.Apply(explodePrim, "Drag")
 67         dragPrimApi.CreateMinimumSpeedAttr(10.0)
 68         dragPrimApi.CreateLinearAttr(1.0e6)
 69         dragPrimApi.CreateSquareAttr(0.0)
 70         dragPrimApi.CreateEnabledAttr(False)
 71         dragPrimApi.CreatePositionAttr(Gf.Vec3f(0.0, 0.0, 0.0))
 72         dragPrimApi.CreateRangeAttr(Gf.Vec2f(-1.0, -1.0))
 73
 74         # Add the collection
 75         collectionAPI = Usd.CollectionAPI.ApplyCollection(explodePrim, ForceFieldSchema.Tokens.forceFieldBodies)
 76         collectionAPI.CreateIncludesRel().AddTarget(stage.GetDefaultPrim().GetPath())
 77
 78         # Boxes
 79         boxSize = Gf.Vec3f(100.0)
 80         boxPosition = Gf.Vec3f(0.0)
 81         m = (int)(math.sqrt(numberOfBoxes))
 82
 83         for i in range(m):
 84             for j in range(m):
 85                 boxPath = boxPathName + str(i) + str(j)
 86                 boxPosition[0] = (i + 0.5 - (0.5 * m)) * boxSpacing * boxSize[0]
 87                 boxPosition[1] = 0.5 * boxSize[1]
 88                 boxPosition[2] = (j + 0.5 - (0.5 * m)) * boxSpacing * boxSize[2]
 89                 boxPrim = physicsUtils.add_rigid_box(stage, boxPath, position=boxPosition, size=boxSize)
 90
 91         # Animate the force fields on and off
 92         global time
 93         time = 0.0
 94
 95         def force_fields_step(deltaTime):
 96             global time
 97             time = time + deltaTime
 98
 99             if time > 4.1:
100                 suckPrimApi.GetEnabledAttr().Set(False)
101                 explodePrimApi.GetEnabledAttr().Set(False)
102                 dragPrimApi.GetEnabledAttr().Set(False)
103             elif time > 4.0:
104                 suckPrimApi.GetEnabledAttr().Set(False)
105                 explodePrimApi.GetEnabledAttr().Set(True)
106                 dragPrimApi.GetEnabledAttr().Set(False)
107             elif time > 2.0:
108                 suckPrimApi.GetEnabledAttr().Set(True)
109                 explodePrimApi.GetEnabledAttr().Set(False)
110                 dragPrimApi.GetEnabledAttr().Set(True)
111             else:
112                 suckPrimApi.GetEnabledAttr().Set(True)
113                 explodePrimApi.GetEnabledAttr().Set(False)
114                 dragPrimApi.GetEnabledAttr().Set(False)
115
116         def timeline_event(event):
117             # on play press
118             if event.type == int(omni.timeline.TimelineEventType.PLAY):
119                 global time
120                 time = 0.0
121
122             # on stop press
123             if event.type == int(omni.timeline.TimelineEventType.STOP):
124                 pass
125
126         physxInterface = omni.physx.get_physx_interface()
127         self._subscriptionId = physxInterface.subscribe_physics_step_events(force_fields_step)
128
129         timelineInterface = omni.timeline.get_timeline_interface()
130         stream = timelineInterface.get_timeline_event_stream()
131         self._timeline_subscription = stream.create_subscription_to_pop(timeline_event)
Please feel free to explore the other demos and their scripts.
Adding Force Fields#
There are two ways to apply force fields to a prim. The first method uses the Add button on in the Property window. Click on the desired prim. Click the Property tab and then click the Add button. A pop up menu will appear. Select the Physics submenu and then select the desired force field to add.
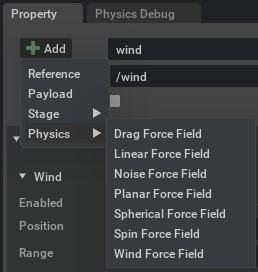
A second method involves right clicking on the prim itself in the Stage window. A pop up menu will appear with the Add > Physics sub menus. Then select the desired force field.

Spherical Force Field#
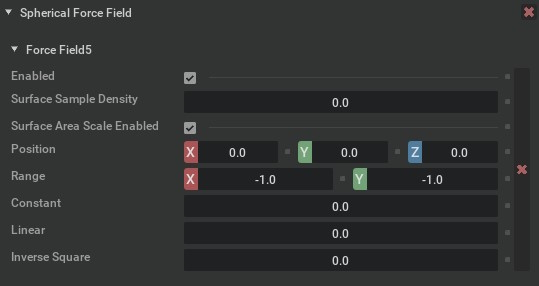
The spherical force field attracts or repels objects to a central point while it is enabled. The following list of properties are available.
Property |
Description |
|---|---|
Enabled |
Turns the force field on or off.
|
Position |
The location of the force field in the world coordinate frame.
|
Range |
Forces are only applied when the physics object is within this minimum and maximum distance from the force field position. A negative distance disables that value. e.g. Setting the minimum and maximum to (-1.0, -1.0) applies forces to objects regardless of their distance.
|
Constant |
A constant force is applied to the physics object regardless of its distance to the force field position. Negative values attract and positive values repel.
|
Linear |
A force that varies linearly with the distance from the force field position, i.e. F = k x d. Negative values attract and positive values repel.
|
Inverse Square |
A force that is inversely proportional to the square of the distance from the force field. i.e. F = k / d^2. Negative values attract and positive values repel.
|
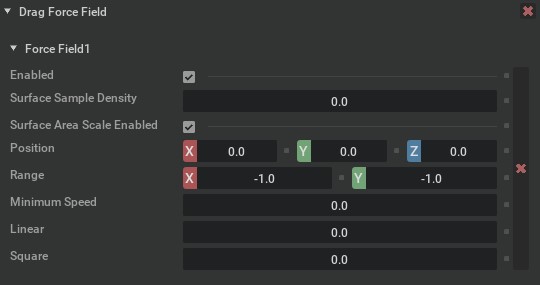
Drag Force Field#
The drag force field generates forces that slow objects down by generating forces that oppose their velocity. The following list of properties are available.
Property |
Description |
|---|---|
Enabled |
Turns the force field on or off.
|
Position |
The location of the force field in the world coordinate frame.
|
Range |
Forces are only applied when the physics object is within this minimum and maximum distance from the force field position. A negative distance disables that value. e.g. Setting the minimum and maximum to (-1.0, -1.0) applies forces to objects regardless of their distance.
|
Minimum Speed |
Drag forces will not be applied when the speed of the physics object is below this minimum. A setting of -1.0 disables this minimum.
|
Linear |
The force varies linearly with the speed of the physics object. D = k x s.
|
Square |
The force varies with the square of the speed of the physics object. D = k x s^2. This is similar to an aerodynamic drag force.
|
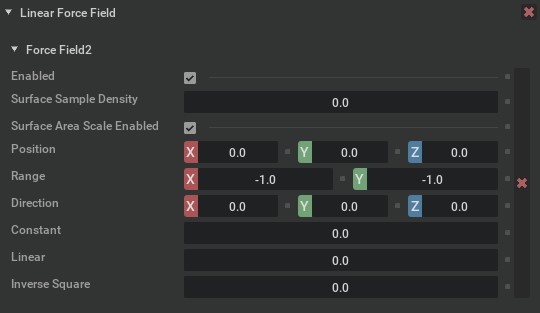
Linear Force Field#
The linear force field generates forces that attract or repel physics objects from the closest point on a line. No force is applied along the direction of the line. The following list of properties are available.
Property |
Description |
|---|---|
Enabled |
Turns the force field on or off.
|
Position |
The location of the force field in the world coordinate frame.
|
Range |
Forces are only applied when the physics object is within this minimum and maximum distance from the force field position. A negative distance disables that value. e.g. Setting the minimum and maximum to (-1.0, -1.0) applies forces to objects regardless of their distance.
|
Direction |
A vector with a length of one, in local space, that describes the orientation of the line.
|
Constant |
A constant force is applied to the physics object regardless of its distance to the line. Negative values attract and positive values repel.
|
Linear |
A force that varies linearly with the distance from the line, i.e. F = k x d. Negative values attract and positive values repel.
|
Inverse Square |
A force that is inversely proportional to the square of the distance from the line. i.e. F = k / d^2. Negative values attract and positive values repel.
|
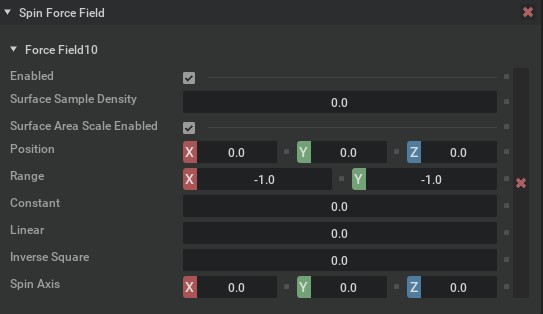
Spin Force Field#
The spin force field generates forces that cause physics objects to spin around a line. No force is applied along the direction of the spin axis. The only difference between this force field and the linear force field is the direction of the resulting force. This linear force field generates forces towards the line, while the spin force field generates forces that are perpendicular to the line. The following list of properties are available.
Property |
Description |
|---|---|
Enabled |
Turns the force field on or off.
|
Position |
The location of the force field in the world coordinate frame.
|
Range |
Forces are only applied when the physics object is within this minimum and maximum distance from the force field position. A negative distance disables that value. e.g. Setting the minimum and maximum to (-1.0, -1.0) applies forces to objects regardless of their distance.
|
Spin Axis |
A vector with a length of one, in local space, that describes the orientation of the axis around which objects rotate.
|
Constant |
A constant force is applied to the physics object regardless of its distance to the spin axis. Negative values attract and positive values repel.
|
Linear |
A force that varies linearly with the distance from the spin axis, i.e. F = k x d. Negative values attract and positive values repel.
|
Inverse Square |
A force that is inversely proportional to the square of the distance from the spin axis. i.e. F = k / d^2. Negative values attract and positive values repel.
|
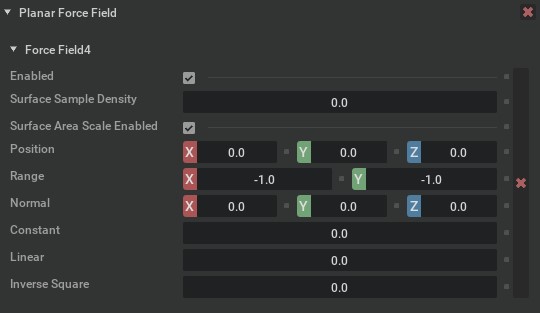
Planar Force Field#
The planar force field generates forces that cause physics objects to be attracted to or repelled away from a plane. The following list of properties are available.
Property |
Description |
|---|---|
Enabled |
Turns the force field on or off.
|
Position |
The location of the force field in the world coordinate frame.
|
Range |
Forces are only applied when the physics object is within this minimum and maximum distance from the force field position. A negative distance disables that value. e.g. Setting the minimum and maximum to (-1.0, -1.0) applies forces to objects regardless of their distance.
|
Normal |
A vector with a length of one, in local space, that describes the normal vector, or orientation, of the plane.
|
Constant |
A constant force is applied to the physics object regardless of its distance to the plane. Negative values attract and positive values repel.
|
Linear |
A force that varies linearly with the distance from the plane, i.e. F = k x d. Negative values attract and positive values repel.
|
Inverse Square |
A force that is inversely proportional to the square of the distance from the plane. i.e. F = k / d^2. Negative values attract and positive values repel.
|
Noise Force Field#
The noise force field generates random forces that cause physics objects to move in a chaotic fashion. The forces change their magnitude and direction smoothly over time. The following list of properties are available.
Property |
Description |
|---|---|
Enabled |
Turns the force field on or off.
|
Position |
The location of the force field in the world coordinate frame.
|
Range |
Forces are only applied when the physics object is within this minimum and maximum distance from the force field position. A negative distance disables that value. e.g. Setting the minimum and maximum to (-1.0, -1.0) applies forces to objects regardless of their distance.
|
Drag |
The drag coefficient determines the magnitude of the force that attempts to align the velocity of the physics object with the noise velocity. Higher values cause the physics objects to change direction more quickly.
|
Amplitude |
The maximum magnitude of the noise signal.
|
Frequency |
The frequency at which the noise signal oscillates.
|
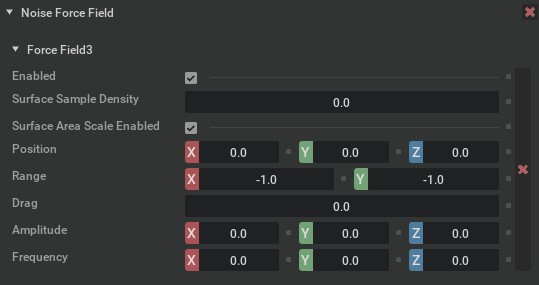
Wind Force Field#
The wind force field causes physics objects to move as if they are blowing in a wind. The wind can vary in wind speed and direction. The following list of properties are available.
Property |
Description |
|---|---|
Enabled |
Turns the force field on or off.
|
Position |
The location of the force field in the world coordinate frame.
|
Range |
Forces are only applied when the physics object is within this minimum and maximum distance from the force field position. A negative distance disables that value. e.g. Setting the minimum and maximum to (-1.0, -1.0) applies forces to objects regardless of their distance.
|
Drag |
The drag coefficient determines the magnitude of the force that attempts to align the velocity of the physics object with the wind velocity. Higher values cause the physics objects to change direction more quickly.
|
Average Speed |
The average speed of the wind.
|
Speed Variation |
The maximum magnitude of the change in wind speed.
|
Speed Variation Frequency |
The frequency at which the wind speed changes.
|
Average Direction |
A vector of unit length that describes the direction in which the wind is blowing.
|
Direction Variation |
A vector of arbitrary length that describes the maximum magnitude of the changes in the wind direction vector along each axis of the local space. The wind direction will be re-normalized into a unit vector after the randomized component is applied.
|
Direction Frequency |
The frequency at which the wind direction oscillates.
|
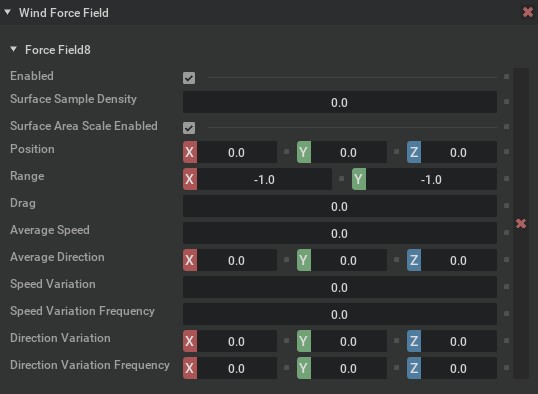
Collections#
The forces generated by the force fields on a prim are applied to the set of rigid bodies specified by the, “forceFieldBodies” USD Collection. This USD collection is currently listed in the Raw USD Properties box, but will be moved into a more visible Property window of its own. Upon initialization, the default prim, “/World” is added to the includes list and the expansionRule is set to expandPrims. The expandPrims setting includes all of the children in the hierarchy of the prims listed, so in this case, every prim in the “/World” will be affected by the force fields.
Multiple prims can be added to the includes. Click the Add Target(s) button and select the prims to include from the list.
If the expansionRule is set to explicitOnly, then only the prims themselves, and none of their children will be affected by the force fields.
Another checkbox, includeRoot specifies whether the prim listed in the includes list should, itself, have forces applied to it. The default setting is to include the root.
To prevent specific rigid bodies from receiving forces, add the prims to the excludes list. Multiple prims can be added to the list. The rules work in the same way. If the expansionRule is set to expandPrims, then the children of the listed prims are also excluded. If the includeRoot checkbox is checked, then root itself is also excluded.

Multiple collections can also be used. Create a second prim, Add new force fields to that prim and then unique includes and excludes lists can be specified.
Tuning the Force Field Properties#
The most difficult part of using the force fields extension is tuning the force coefficients labeled Constant, Linear, InverseSquare and Drag. These settings will depend on the masses of the rigid bodies that are being affected, so the more massive the object to be moved, the larger the setting should be. However, since lighter objects need to accelerate faster than heavier objects inside a force field, this difficulty is necessary. It just takes time to find settings that generate the desired results. The following suggestions should make it a bit easier.
A recommended approach is to first determine whether to use the Constant, Linear or Inverse Square as the primary property. Constant generates a force that will accelerate objects at a steady rate. The Linear force generates behaviors similar to a spring that results in sinusoidal motion. The Inverse Square term is how gravity is modelled. It tends to attract or repel very slowly at large distances but generates extremely strong forces nearby.
Do the tuning while the simulation is running. This avoid the necessity to continuously press the simulation Start and Stop buttons. Next, determine the correct order of magnitude for the force. Start by setting the coefficient to 1e0, and continue increasing the exponent until the rigid body objects start to move (1e1, 1e2, 1e3, etc.). Once the order of magnitude is known, adjust the mantissa to fine tune the results.
Using Force Fields In Python#
Setting up force fields in Python uses script to run through the same steps as going through the UI. The only difference is that the “forceFieldBodies” USD Collection must be created manually.
The creation of a Physics scene, ground plane and the rigid bodies themselves is also required, but not covered here. The first step is to create a prim to hold all of the force fields. Add a translate operation to create a transformation matrix that can be positioned and animated.
1 from pxr import ForceFieldSchema
2
3     # Create the force field prim
4     xformPrim = UsdGeom.Xform.Define(stage, "/World/Prim")
5     xformPrim.AddTranslateOp().Set(Gf.Vec3f(0.0, 300.0, 0.0))
6     prim = xformPrim.GetPrim()
Next, create the various force fields by applying them to the new prim and creating the attributes that need to be changed.
1     explodePrimApi = ForceFieldSchema.PhysxForceFieldSphericalAPI.Apply(prim, "Explode")
2     explodePrimApi.CreateConstantAttr(4e10)
3     explodePrimApi.CreateLinearAttr(0.0)
4     explodePrimApi.CreateInverseSquareAttr(0.0)
5     explodePrimApi.CreateEnabledAttr(True)
6     explodePrimApi.CreatePositionAttr(Gf.Vec3f(0.0, 0.0, 0.0))
7     explodePrimApi.CreateRangeAttr(Gf.Vec2f(-1.0, -1.0))
To create the USD Collection, use the following lines of code. This will include all rigid bodies in the scene.
1     # Add the collection
2     collectionAPI = Usd.CollectionAPI.ApplyCollection(prim, ForceFieldSchema.Tokens.forceFieldBodies)
3     collectionAPI.CreateIncludesRel().AddTarget(stage.GetDefaultPrim().GetPath())
The previous steps are sufficient to get the force fields to work and affecting the rigid bodies in the scene. But it is also possible to animate any of the USD properties while the simulation is running. To do this, add a call back in the script that can be used to update the settings. Be sure to save the subscription ID’s in the class or they will be destroyed and the callback functions will not be called.
 1     global time
 2     time = 0.0
 3
 4     def force_fields_step(deltaTime):
 5         global time
 6         time = time + deltaTime
 7
 8         if time > 2.0:
 9             explodePrimApi.GetEnabledAttr().Set(False)
10         else:
11             explodePrimApi.GetEnabledAttr().Set(True)
12
13     def timeline_event(event):
14         # on play press
15         if event.type == int(omni.timeline.TimelineEventType.PLAY):
16             global time
17             time = 0.0
18
19         # on stop press
20         if event.type == int(omni.timeline.TimelineEventType.STOP):
21             pass
22
23     physxInterface = omni.physx.get_physx_interface()
24     self._subscriptionId = physxInterface.subscribe_physics_step_events(force_fields_step)
25
26     timelineInterface = omni.timeline.get_timeline_interface()
27     stream = timelineInterface.get_timeline_event_stream()
28     self._timeline_subscription = stream.create_subscription_to_pop(timeline_event)
OmniGraph Force Fields Nodes Documentation#
This document describes the OmniGraph nodes available in the Force Fields extension. You can find them by searching for “Force Field” in the Action Graph search box. They are all under the Generic category.
NOTE: The nodes automatically update the USD stage. It is possible for them to get out of sync. If that happens just save and reload the scene. That will cause the Force Fields properties to regenerate and should get things back in sync.
Using Force Field OmniGraph Nodes#
All of the Force Field OmniGraph nodes have Enabled, Execution, Position, a list of Prim Paths and Range inputs. By default, all Force Field nodes are enabled, have an unlimited range and are positioned at the origin. These inputs are not mandatory so that the Force Field will apply forces to any input prims when the node is executed. However, to get a Force Field node to function the Execution and Prim Paths inputs must be connected.
The Execution input can come from any other node that provides an Exec Out output. The Force Field node will then execute after the previous node has completed. If an Exec Out output is not available, the On Tick node can be used to generate a Tick output. The order of execution of a Force Field node is non-critical because all forces are added to the physics rigid body before their equations of motion are updated. This is why Force Field nodes do not have Exec Out outputs.
The second required input specifies which Prims the force field should act on. Two very useful OmniGraph nodes that provide this list of Prim Paths are the Find Prims and scene Overlap nodes. When the list of rigid body objects does not change, when the Force Fields should act on every body in the scene, for example, the Find Prims node is ideal. Specify the search criteria and where the search should occur and the search results will be provided in a list.
Example #1#
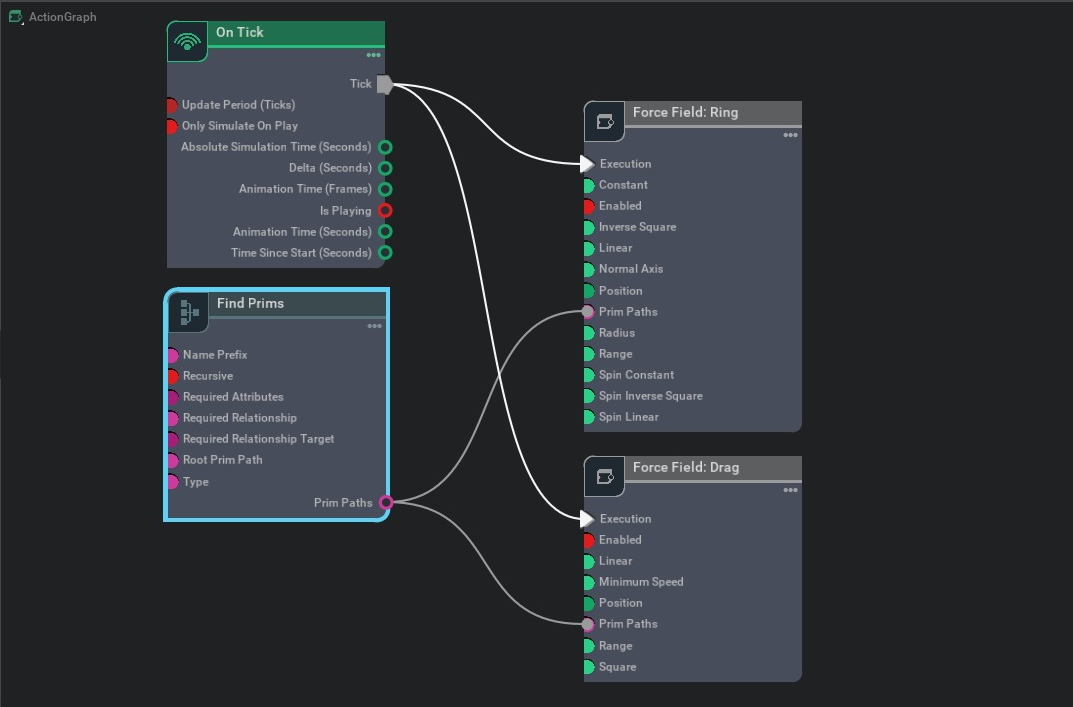
In the following simple example, an On Tick node generates the Tick and the Find Prims node generates the Prim Paths outputs to both the Ring and Drag Force Field nodes.
The Find Prims properties in this case search through all of the prims on the stage for prims that contain the string “Sphere” by listing the “/World” prim path in the rootPrimPath and checking the recursive check box.
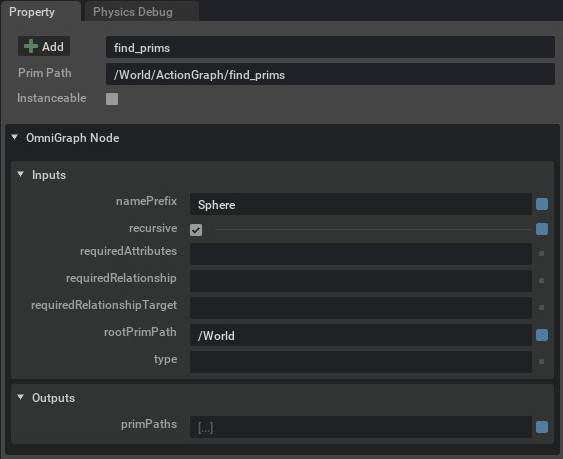
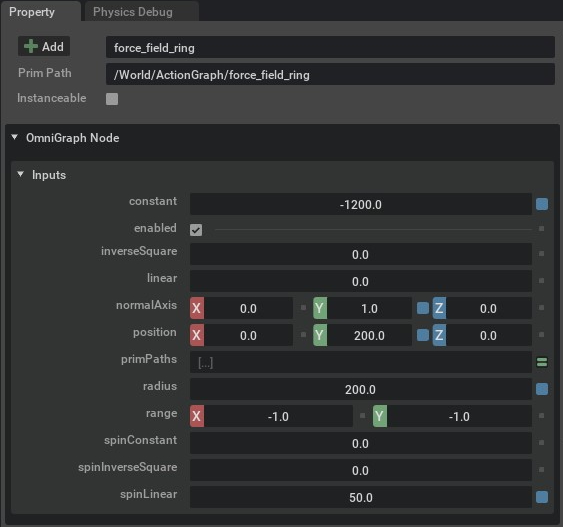
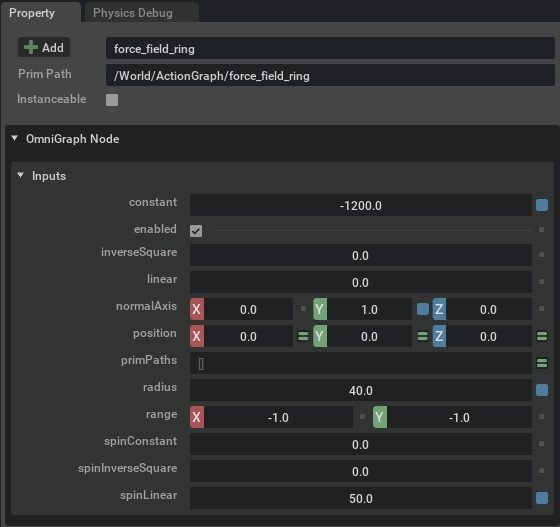
There are two ways to control the Force Field behaviors themselves, by setting the values manually in the Properties tab, or by passing them as inputs to the Force Field node. In this example, they are set directly in the properties tab. When an ‘=’ sign appears to the right of the property, anything entered in the property edit field will be overwritten by a node input.
Example #2#
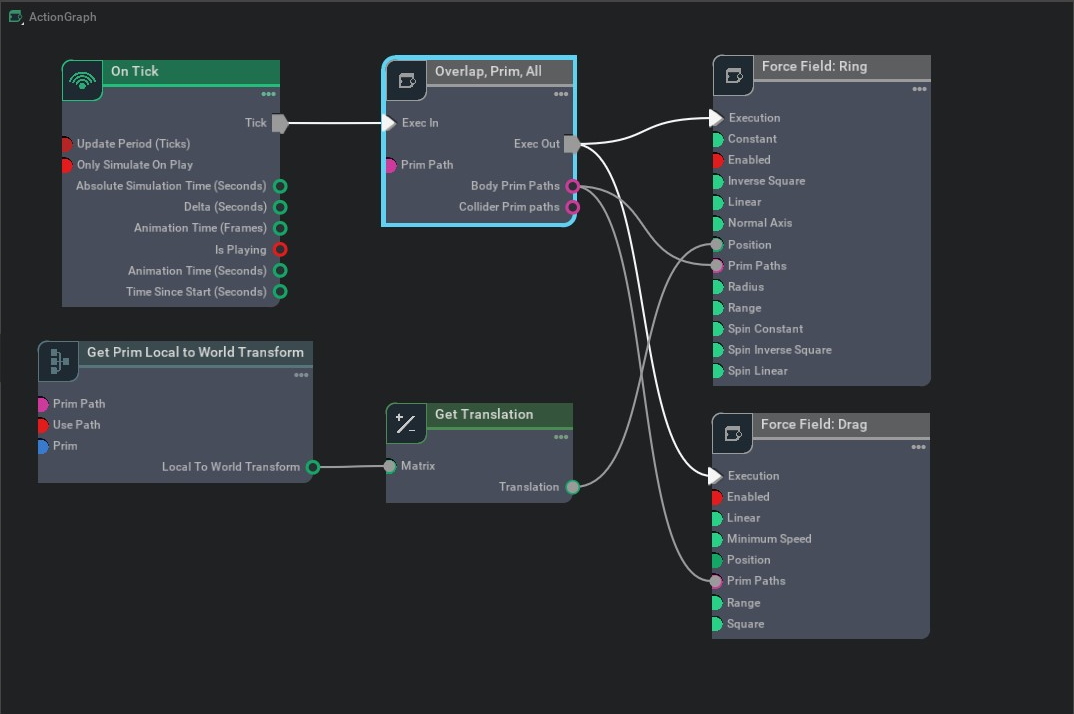
Another powerful tool for generating a list of Prim Paths to pass to the Force Fields are the PhysX scene Overlap OmniGraph nodes. Modifying the previous example by replacing the Find Prims node with the Overlap, Prim, All node allows a sphere to be animated or manually dragged around the scene to “scoop up” rigid bodies as they enter the sphere and ejected when they are forced outside the sphere.
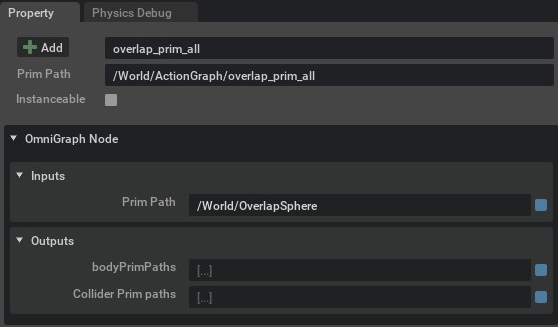
The Overlap nodes generate lists of Prims that intersect with the Prim that is specified by the Prim Path input or the PrimPath property. In this example, the “/World/OverlapSphere” is the geometry used to test for overlapping objects.
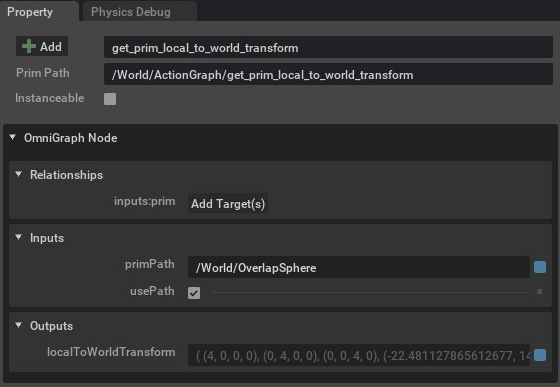
In order to update the position of the Ring Force Field as the “/World/OverlapSphere” is moved, two additional OGN nodes are utilized, the Get Prim Local to World Transform, which extracts the transformation matrix from the OverlapSphere, and the Get Translation node, which separates the position from the transform. This position is then passed to the Ring Force Field.
Notice how the Ring Force Field properties have been tuned a small amount so that the rigid bodies fit inside the glass sphere when they are picked up. The position property has an ‘=’ sign to its right, indicating that it is being set by an input.
Force Fields Demo#
Another demo that can be interacted with is included in the Force Fields extension. To open it, enable the Window > Physics > Demo Scenes window, then select the ForceFieldOmniGraphDemo and click the Load Scene button.

To view and edit the Action Graph, open the Window > Visual Scripting > Action Graph window from the menu bar. Then click on the Action Graph window Edit button and open the “/World/ActionGraph”.
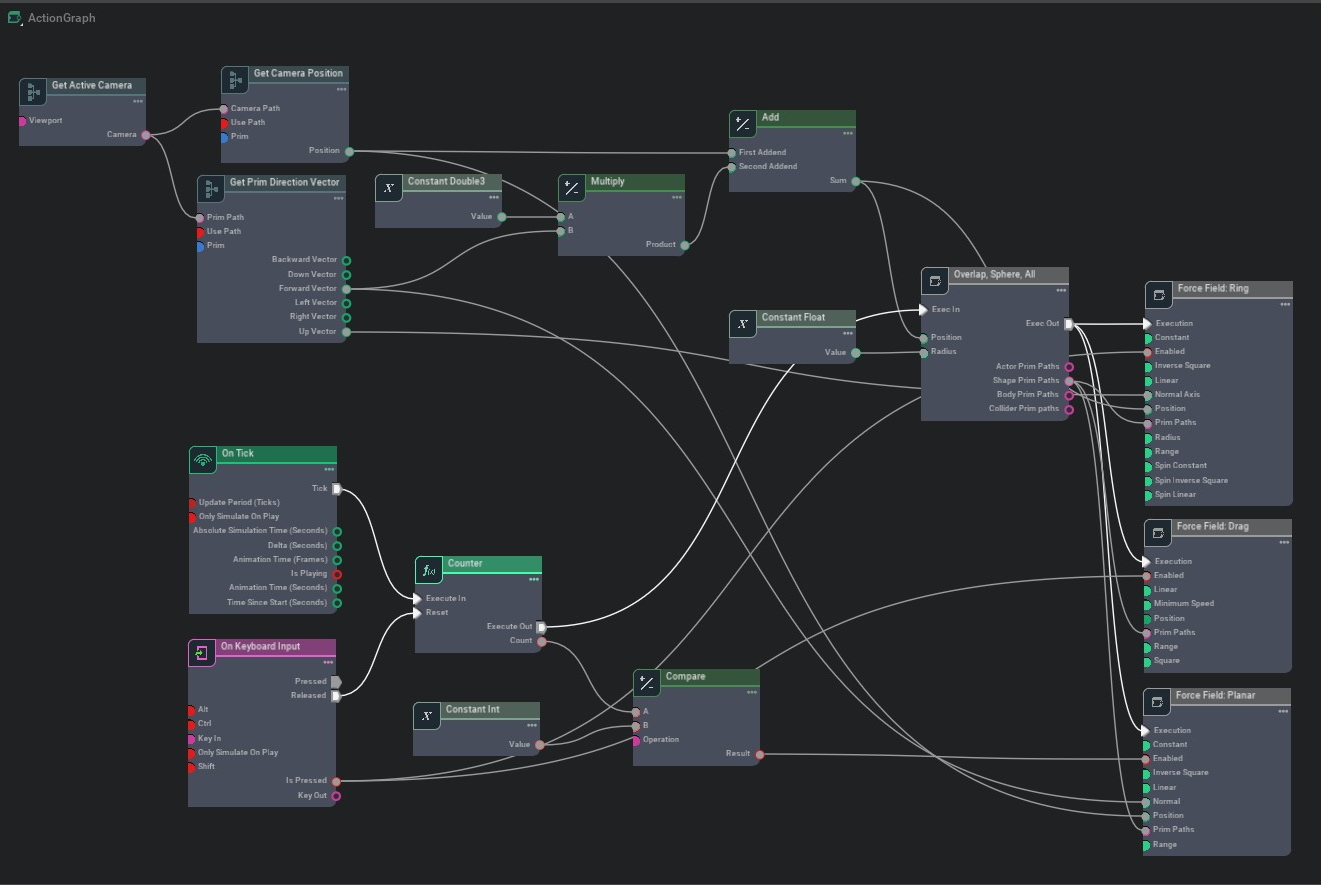
This demo builds on the previous example by setting the Ring Force Field Position and the Overlap, Sphere, All Position inputs to a point directly in front of the active camera. The Ring Normal Axis input is also obtained from the active camera’s Up Vector. An On Keyboard Input node is added that watches for the, “Shift-C” key combination to be pressed. The, Is Pressed output is connected to the Ring and Drag Enabled inputs to activate those Force Fields. This set up allows the camera to be moved through the scene with the standard w, a, s and d keys and mouse inputs. When Shift-C is pressed, the Ring and Drag Force Fields are enabled and the rigid bodies inside the invisible Overlap Sphere are acted upon and begin to orbit a point in front of the camera.
Instead of simply allowing the rigid bodies to fall back to the floor when Shift-C is released, another Force Field is added to shoot them away from the camera. It is only activated for a short period of time, specified by the number of counts listed in the Constant Int input to the Compare node. A Counter node is reset each time the Shift-C is released and acts as the timer.
Press Play to start the simulation and experiment with the different node and property settings to see what different effects can be created.
Force Field OmniGraph Nodes Reference#
Please refer to the OmniGraph Node Library for a detailed description of each of the Force Fields nodes.