Make sure to source your ROS 2 installation from the terminal before running Isaac Sim. If sourcing ROS 2 is a part of your .bashrc then Isaac Sim can be run directly.
Set the FASTRTPS_DEFAULT_PROFILES_FILE environment variable per instructions in ROS and ROS 2 Installation before launching Isaac Sim, as well as any terminal where ROS messages will be sent or received, and ROS 2 Extension is enabled.
One of the main styles of communication interfaces of ROS 2 is the topic. Its use is oriented to send/receive messages of continuous data streams like robot state (nav_msgs/msg/Odometry), sensors (e.g: sensor_msgs/msg/Imu), among others.
You can list the available message types (for topics), for the current sourced ROS 2 distro (and workspace), using the following command in a new ROS2-sourced terminal:
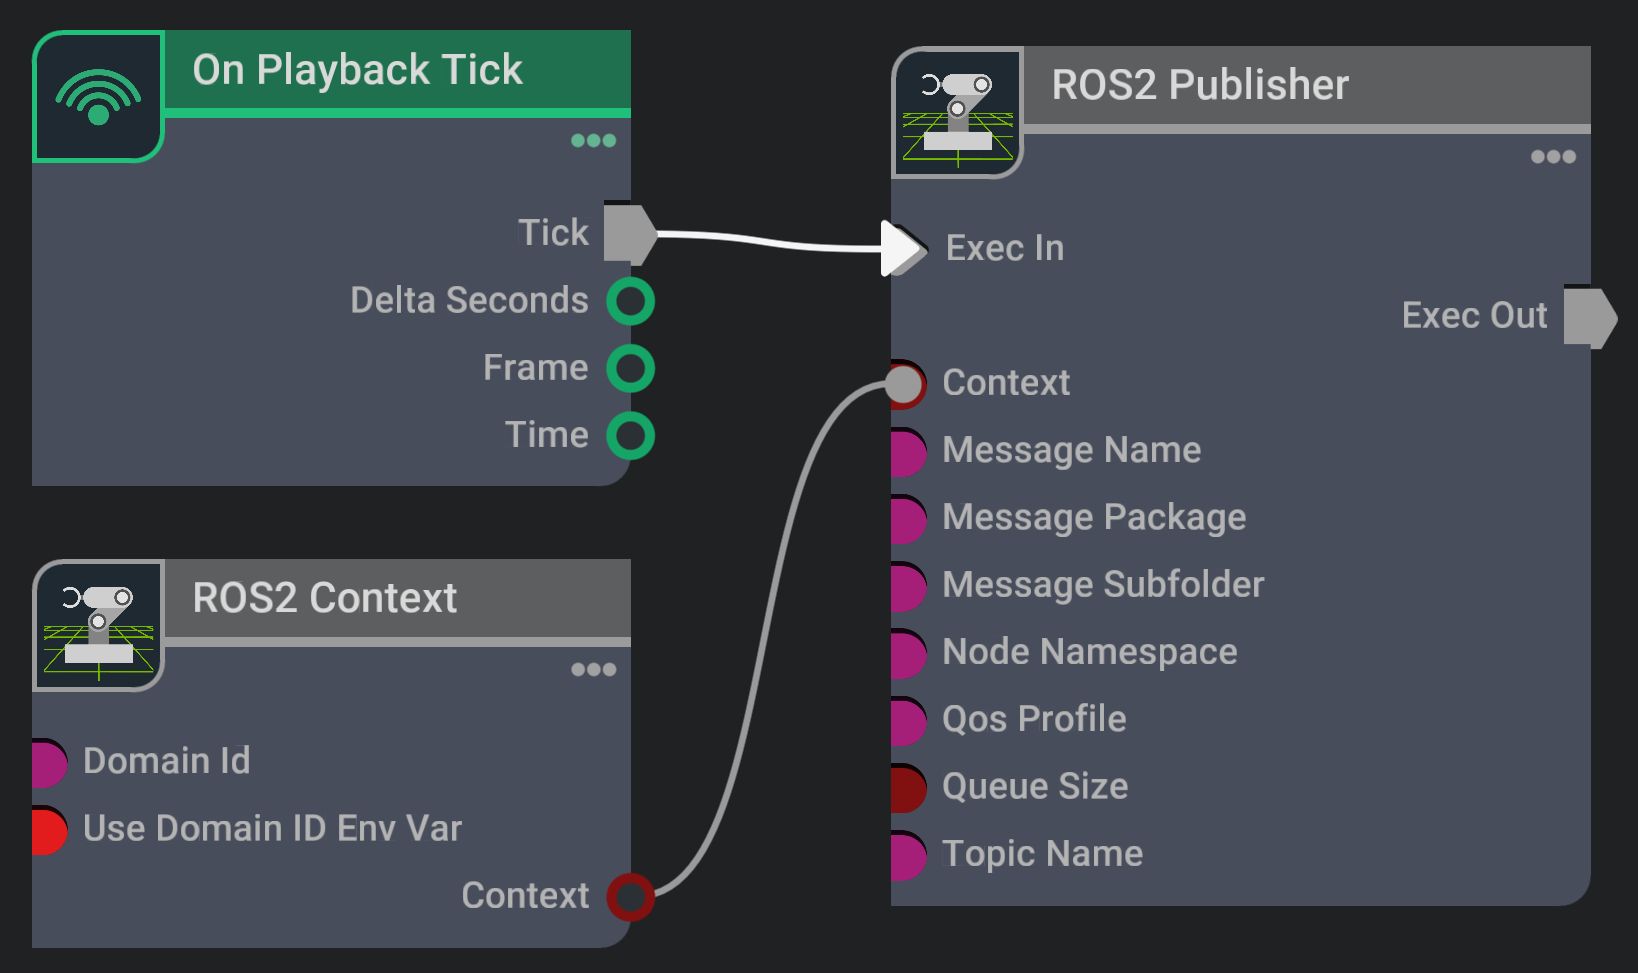
Go to Create > Visual Scripting > Action Graph to create an Action Graph.
Add (and connect) the following OmniGraph nodes into the Action Graph:
On Playback Tick node to execute other graph nodes every simulation frame.
ROS2 Context node to create a context using either the given Domain ID or the ROS_DOMAIN_ID environment variable.
ROS2 Publisher node to publish a message of any type to a ROS 2 topic.
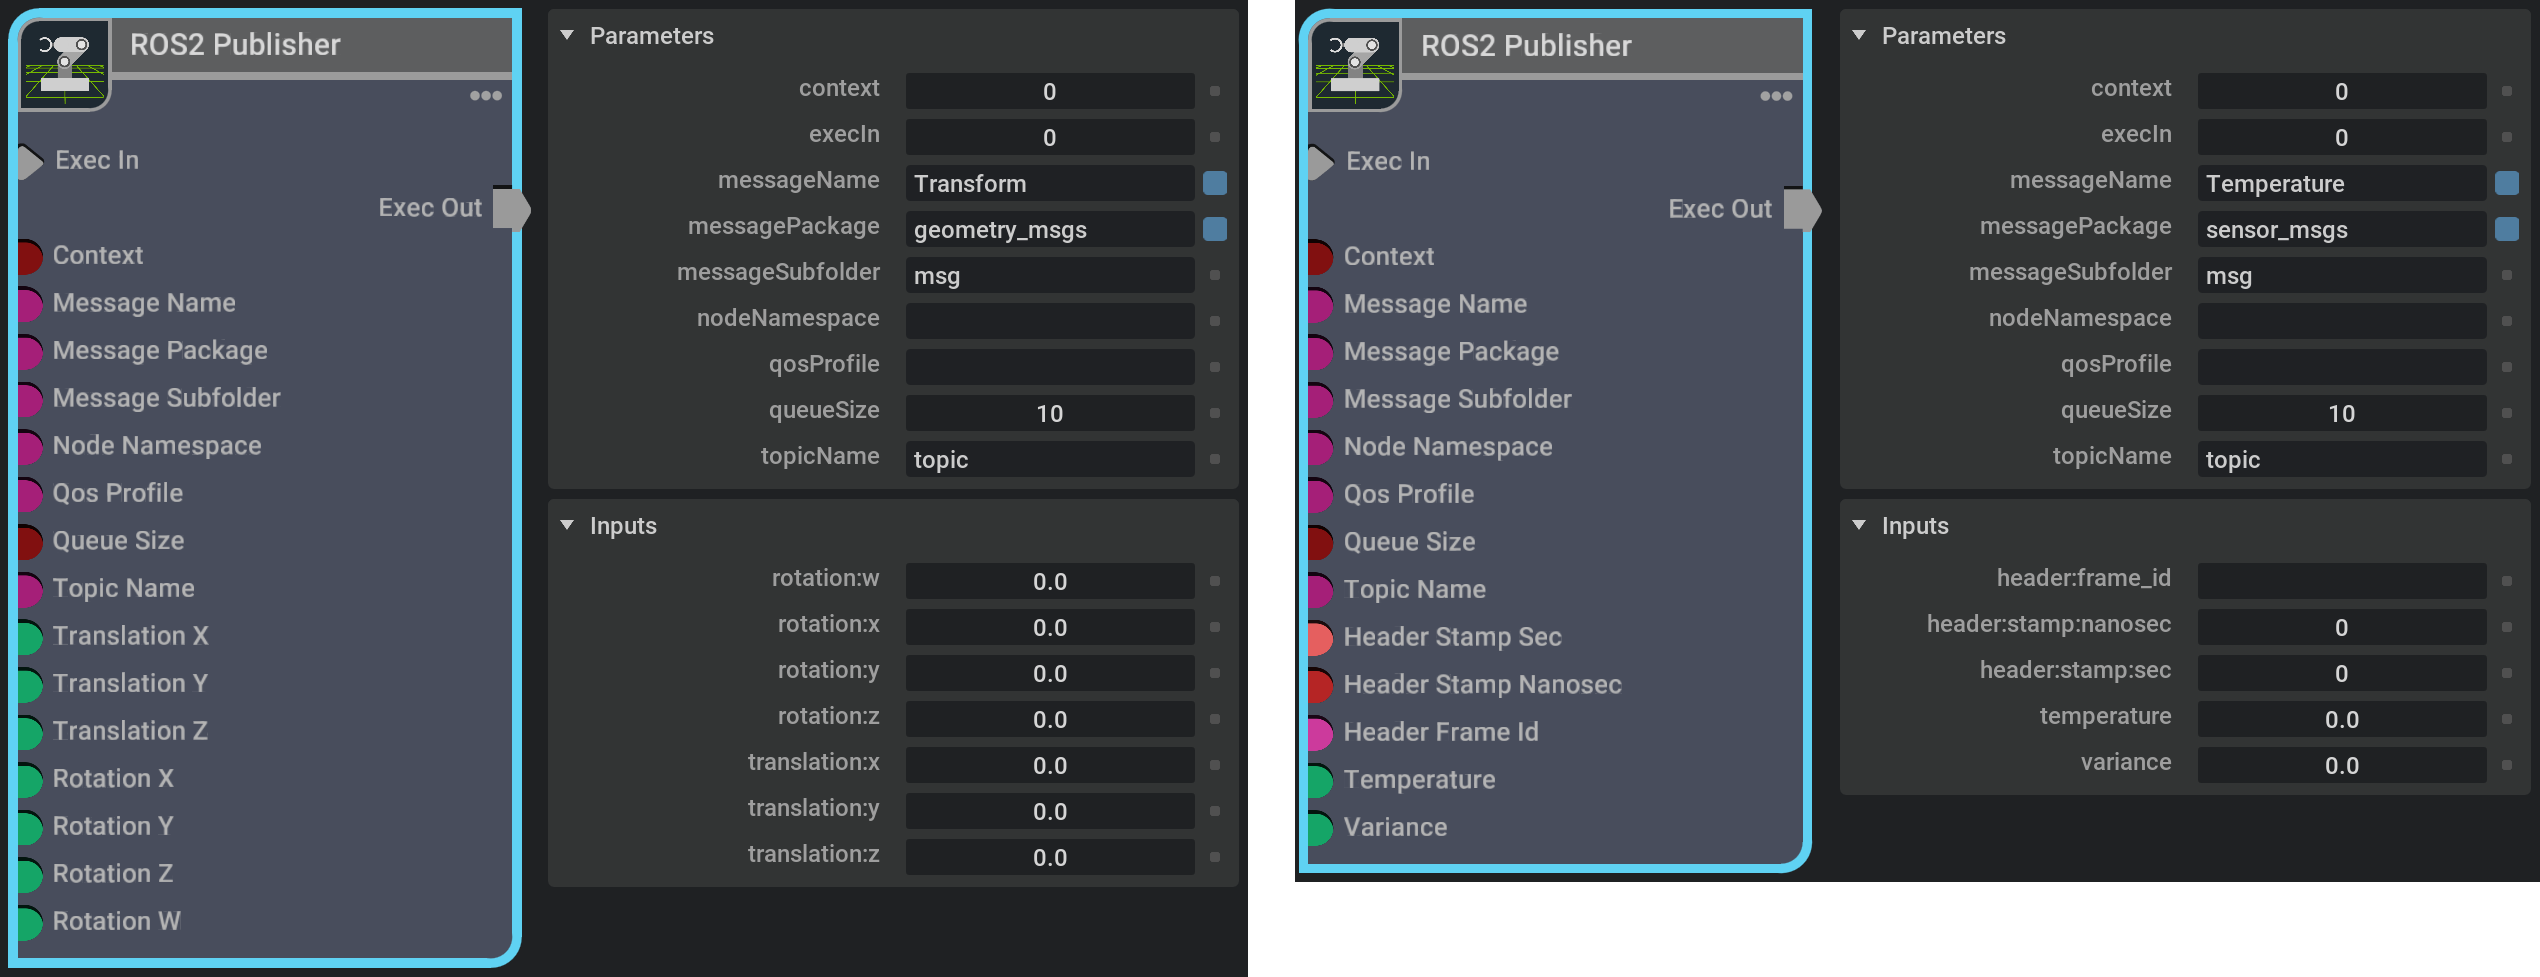
Define, in the node Property panel, the message type following the next pattern: messagePackage/messageSubfolder/messageName. When a valid (existing) message type is defined, the node will reconfigure its input attributes in order to set the values to be published.
Note
The node input attributes reconfiguration in OmniGraph follows the next rules:
Fields of ROS 2 type embedded message (e.g.: std_msgs/Headerheader) are un-rolled in new attributes.
Fields of ROS 2 type array of embedded message (e.g.: geometry_msgs/Point32[]points) are treated as a unique attribute of type token array. Each token is encoded as JSON.
Hint
It is not necessary to play the simulation to (re)configure the node’s input attributes for different message types.
Example of the node input attributes reconfiguration for different message types:
Connect outputs from other nodes or set values in the Property panel to the inputs to populate the data to be published.
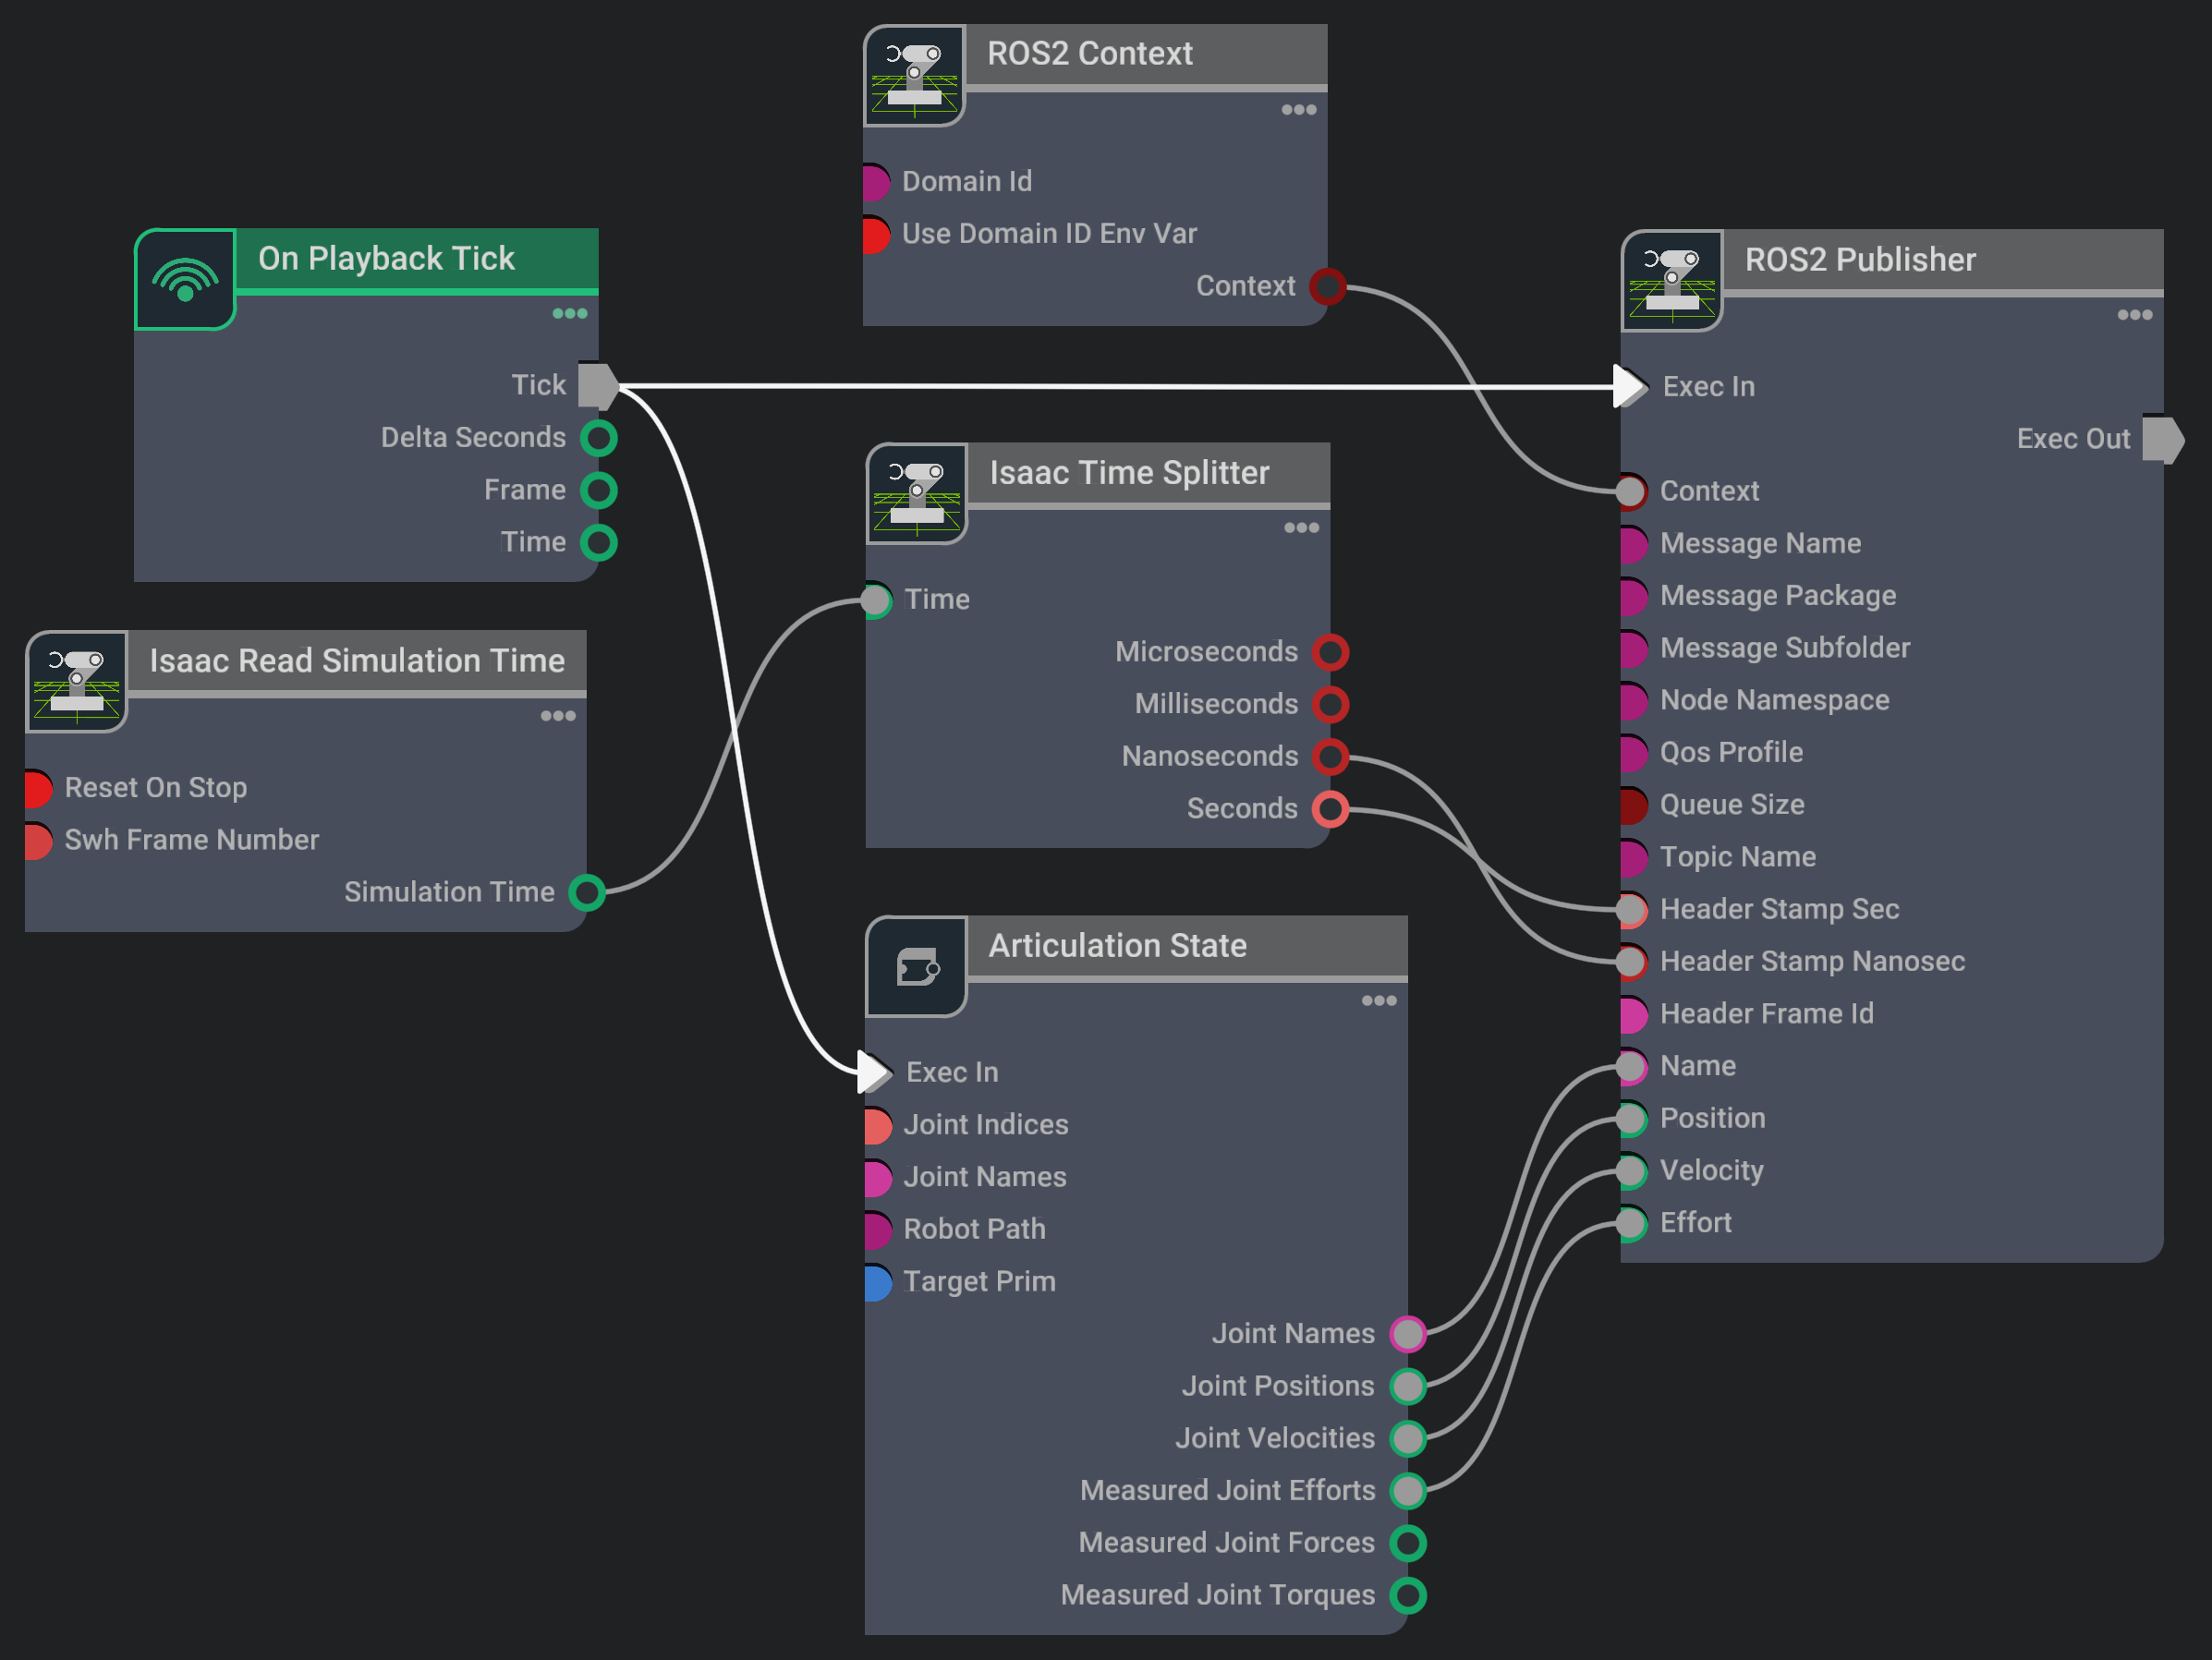
The following example shows how to publish to the topic /joint_states, using a the ROS 2 message type sensor_msgs/msgs/JointState, the joint states (positions, velocities and efforts) of a robot using the generic ROS2 Publisher node.
In a new stage, load the Franka robot using the Isaac Examples > Import Robots > Franka URDF menu. Then click on LOAD and CONFIGURE, in the Import Franka window, to load the environment and configure the robot.
Go to Create > Visual Scripting > Action Graph to create an Action Graph and add, connect and configure the following OmniGraph nodes into the Action Graph:
On Playback Tick node to execute other graph nodes every simulation frame.
Isaac Read Simulation Time node to retrieve current simulation time. Note: By default the simulation time increases monotonically, meaning regardless of whether simulation is stopped and re-played, the time will continue incrementing. This is mainly to prevent issues that may aries with the time jumping back when simulation resets. You can set resetOnStop to True if you would like the clock to start from 0 every time simulation is reset.
Isaac Time Splitter node to split the current simulation time to fill the ROS 2 std_msgs/Headerheader message timestamp (expressed as seconds and nanoseconds).
Articulation State node to get the robot articulation states (joint positions, velocities and efforts) to fill the sensor_msgs/msgs/JointState message.
ROS2 Context node to create a context using either the given Domain ID or the ROS_DOMAIN_ID environment variable.
ROS2 Publisher node to publish a message of any type to a ROS 2 topic.
Parameters:
Node
Input field
Value
ROS2 Publisher
messagePackage
sensor_msgs
messageName
JointState
topicName
joint_states
Articulation State
targetPrim
/panda
Play the simulation to start publishing and click on MOVE, in the Import Franka window, to move the robot.
Use the following command in a new ROS2-sourced terminal to see the published messages:
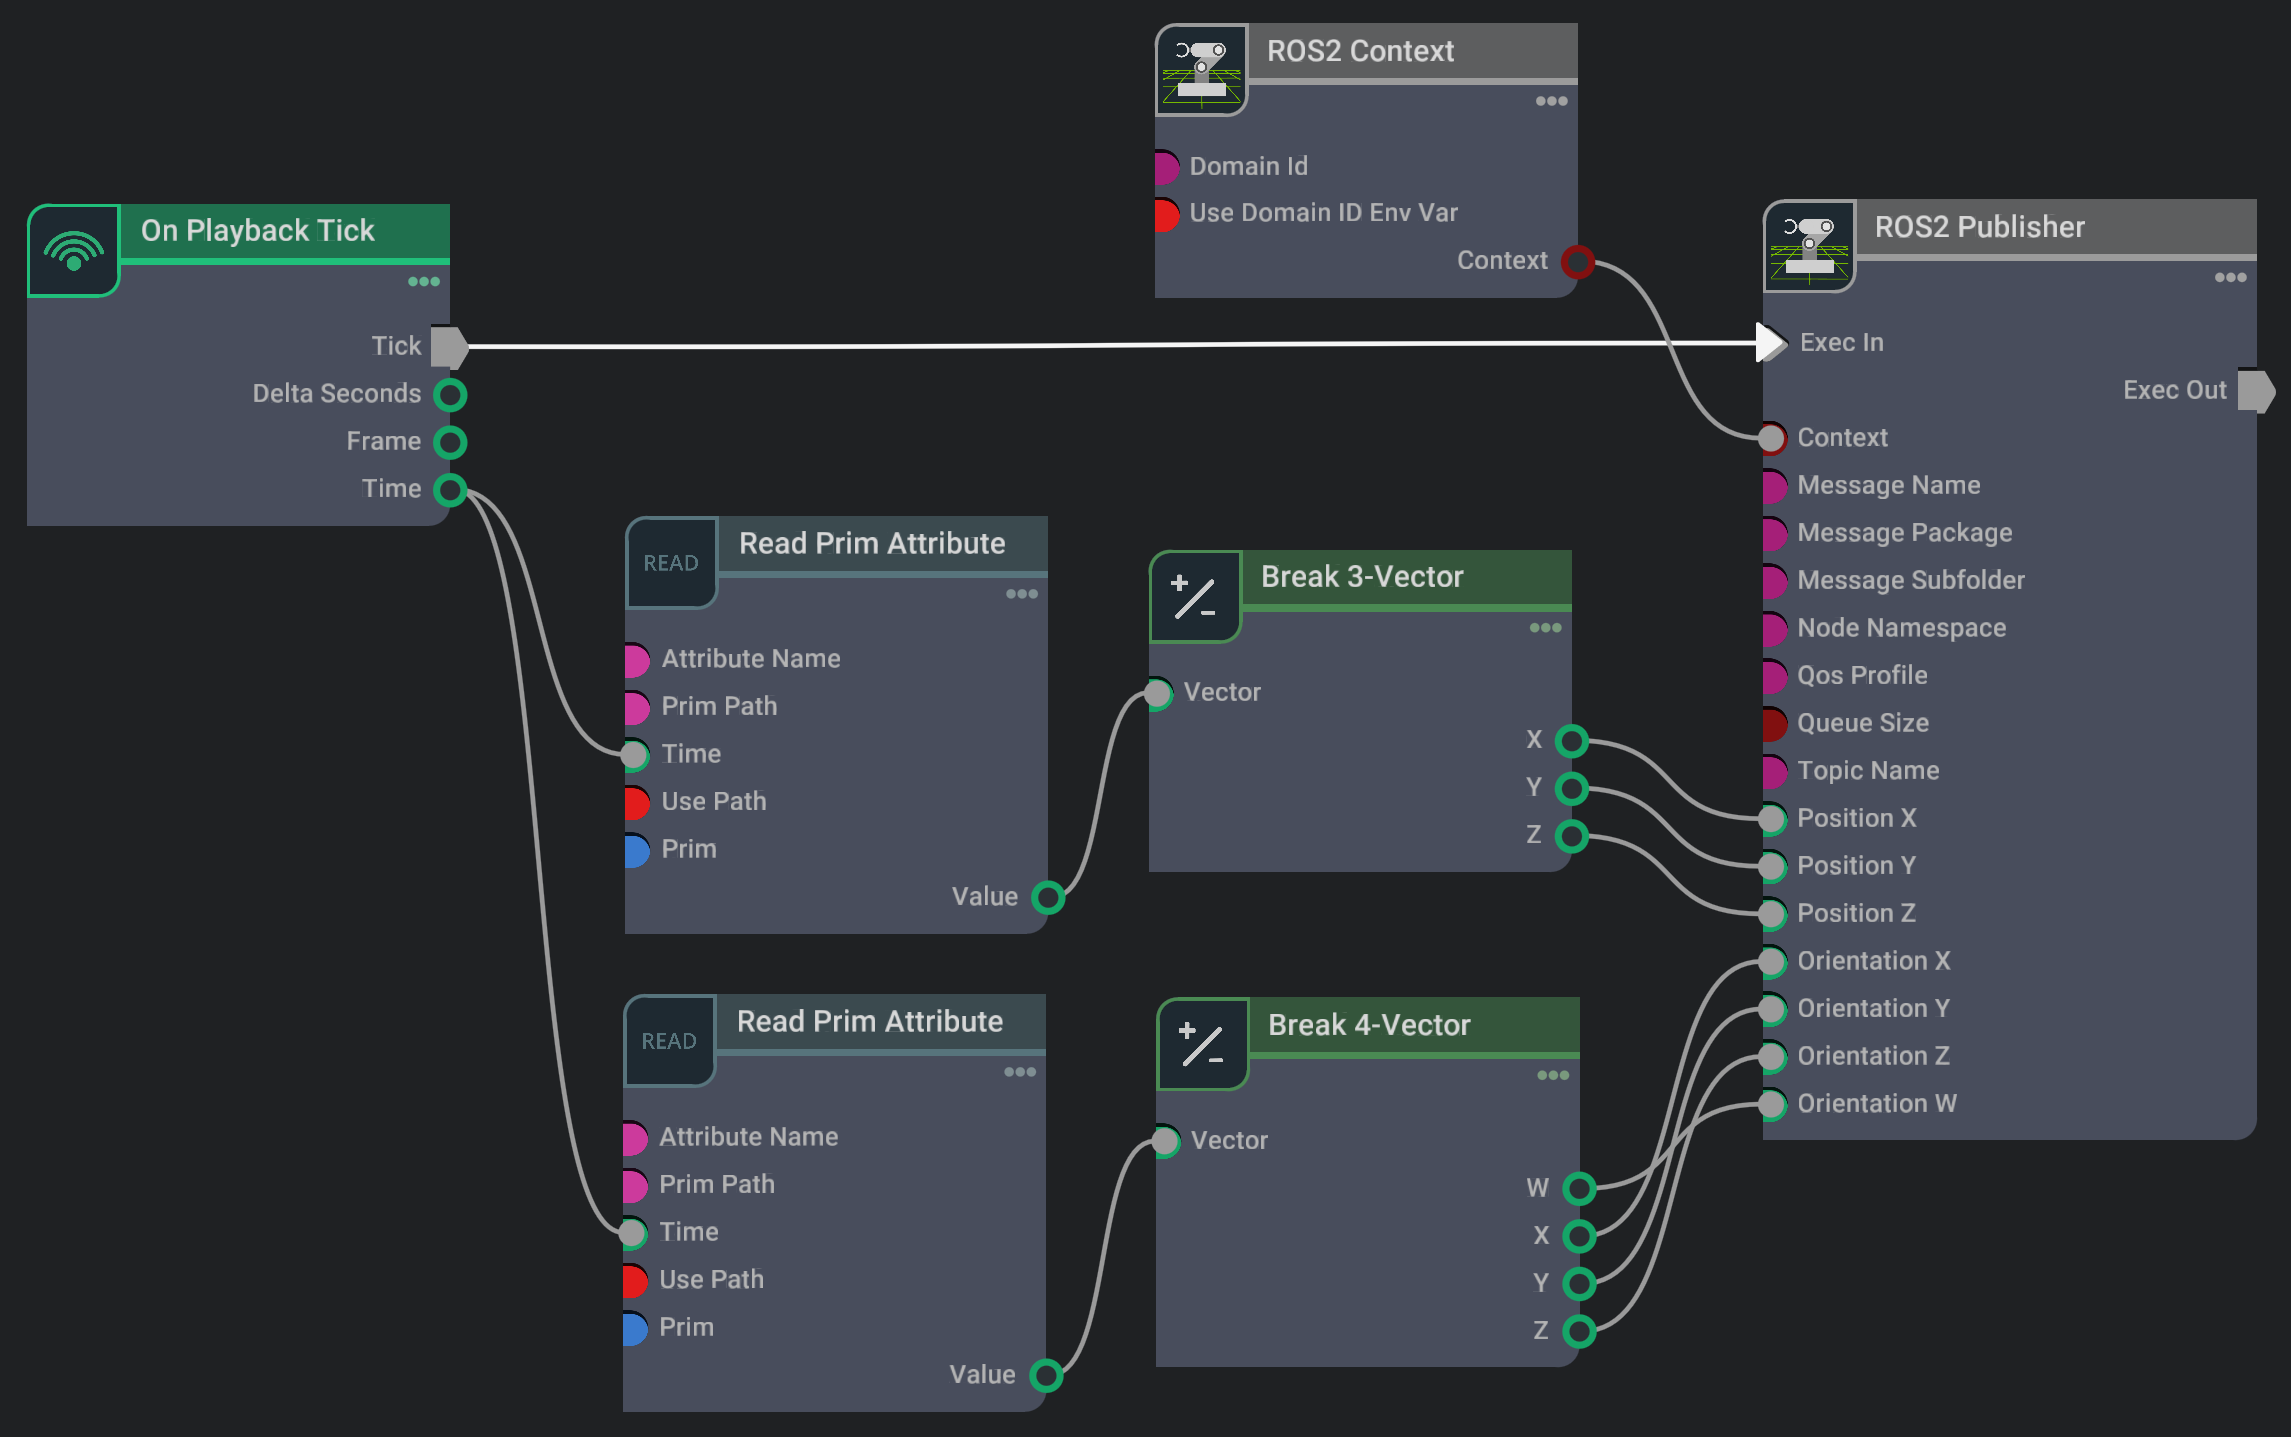
The following example shows how to publish to the topic /object_pose, using a the ROS 2 message type geometry_msgs/msgs/Pose, the pose of an object using the generic ROS2 Publisher node.
In a new stage, create an object (Cube) using the Create > Shape > Cube menu. Then select the Cube (/World/Cube) and right click Add > Physics > Rigid Body with Colliders Preset to enable free-fall.
Go to Create > Visual Scripting > Action Graph to create an Action Graph and add, connect and configure the following OmniGraph nodes into the Action Graph:
On Playback Tick node to execute other graph nodes every simulation frame.
Read Prim Attribute node to get a specific prim attribute values.
Break 3-Vector node for individual access to the components of a three-component vector.
ROS2 Context node to create a context using either the given Domain ID or the ROS_DOMAIN_ID environment variable.
ROS2 Publisher node to publish a message of any type to a ROS 2 topic.
Parameters:
Node
Input field
Value
ROS2 Publisher
messagePackage
geometry_msgs
messageName
Pose
topicName
object_pose
Read Prim Attribute
(upper node)
Prim
/World/Cube
Attribute Name
xformOp:translate
Read Prim Attribute
(lower node)
Prim
/World/Cube
Attribute Name
xformOp:orient
Play the simulation to start publishing.
Use the following command in a new ROS2-sourced terminal to see the published messages:
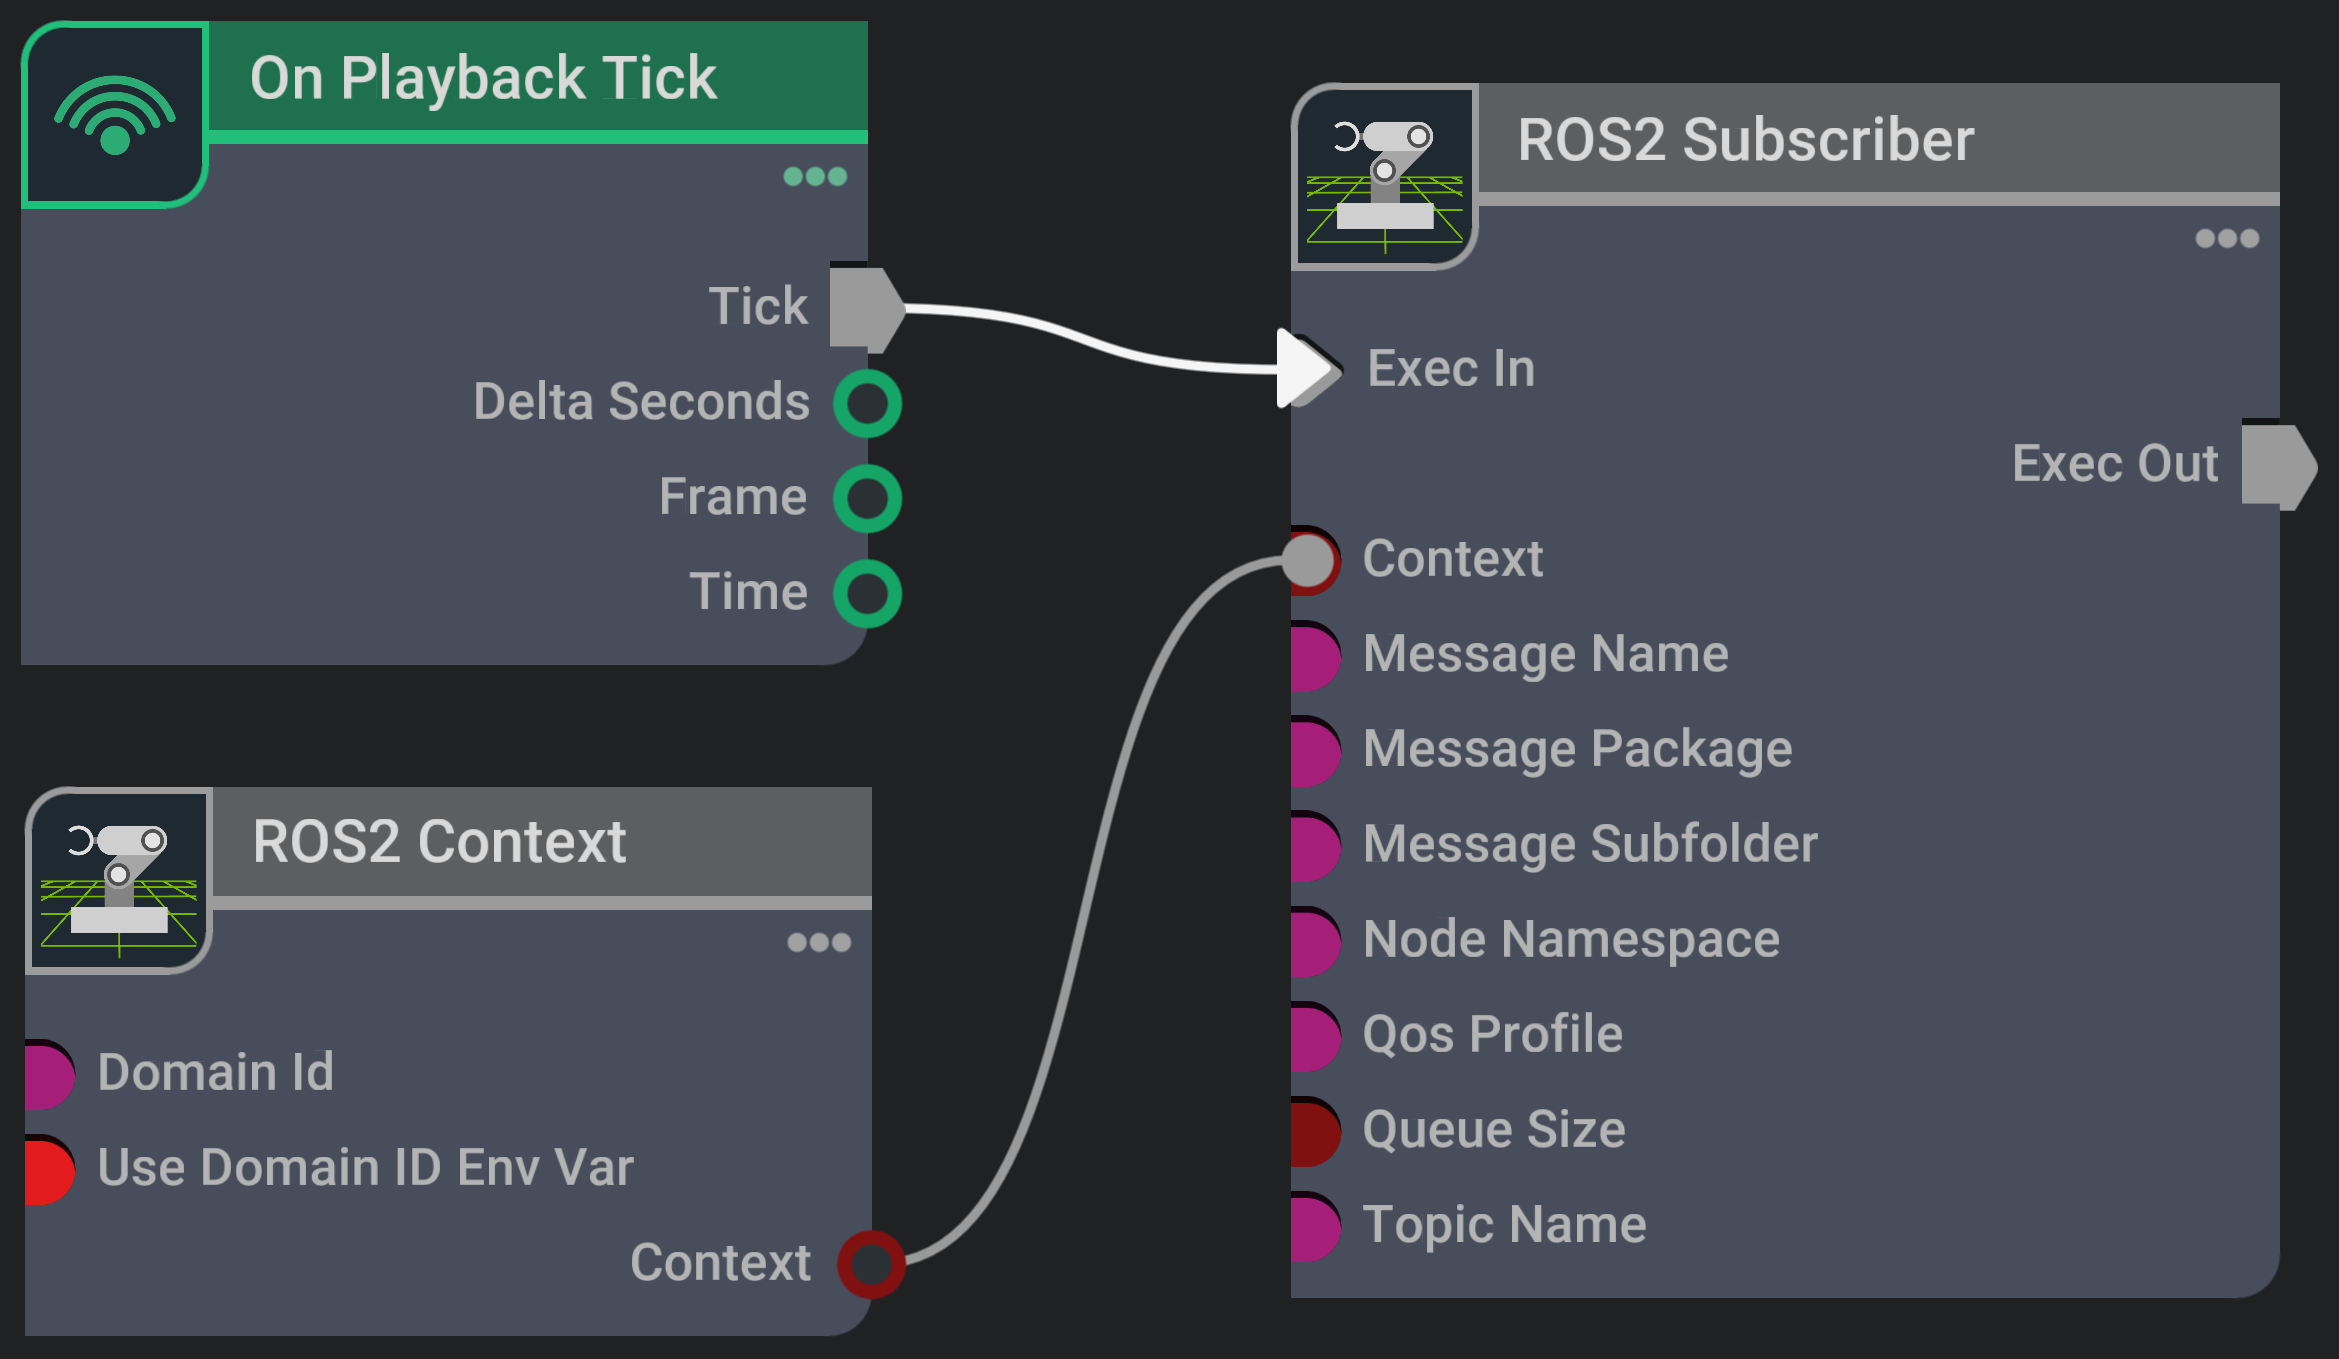
Go to Create > Visual Scripting > Action Graph to create an Action Graph.
Add (and connect) the following OmniGraph nodes into the Action Graph:
On Playback Tick node to execute other graph nodes every simulation frame.
ROS2 Context node to create a context using either the given Domain ID or the ROS_DOMAIN_ID environment variable.
ROS2 Subscriber node to subscribe to a ROS 2 topic of any message type.
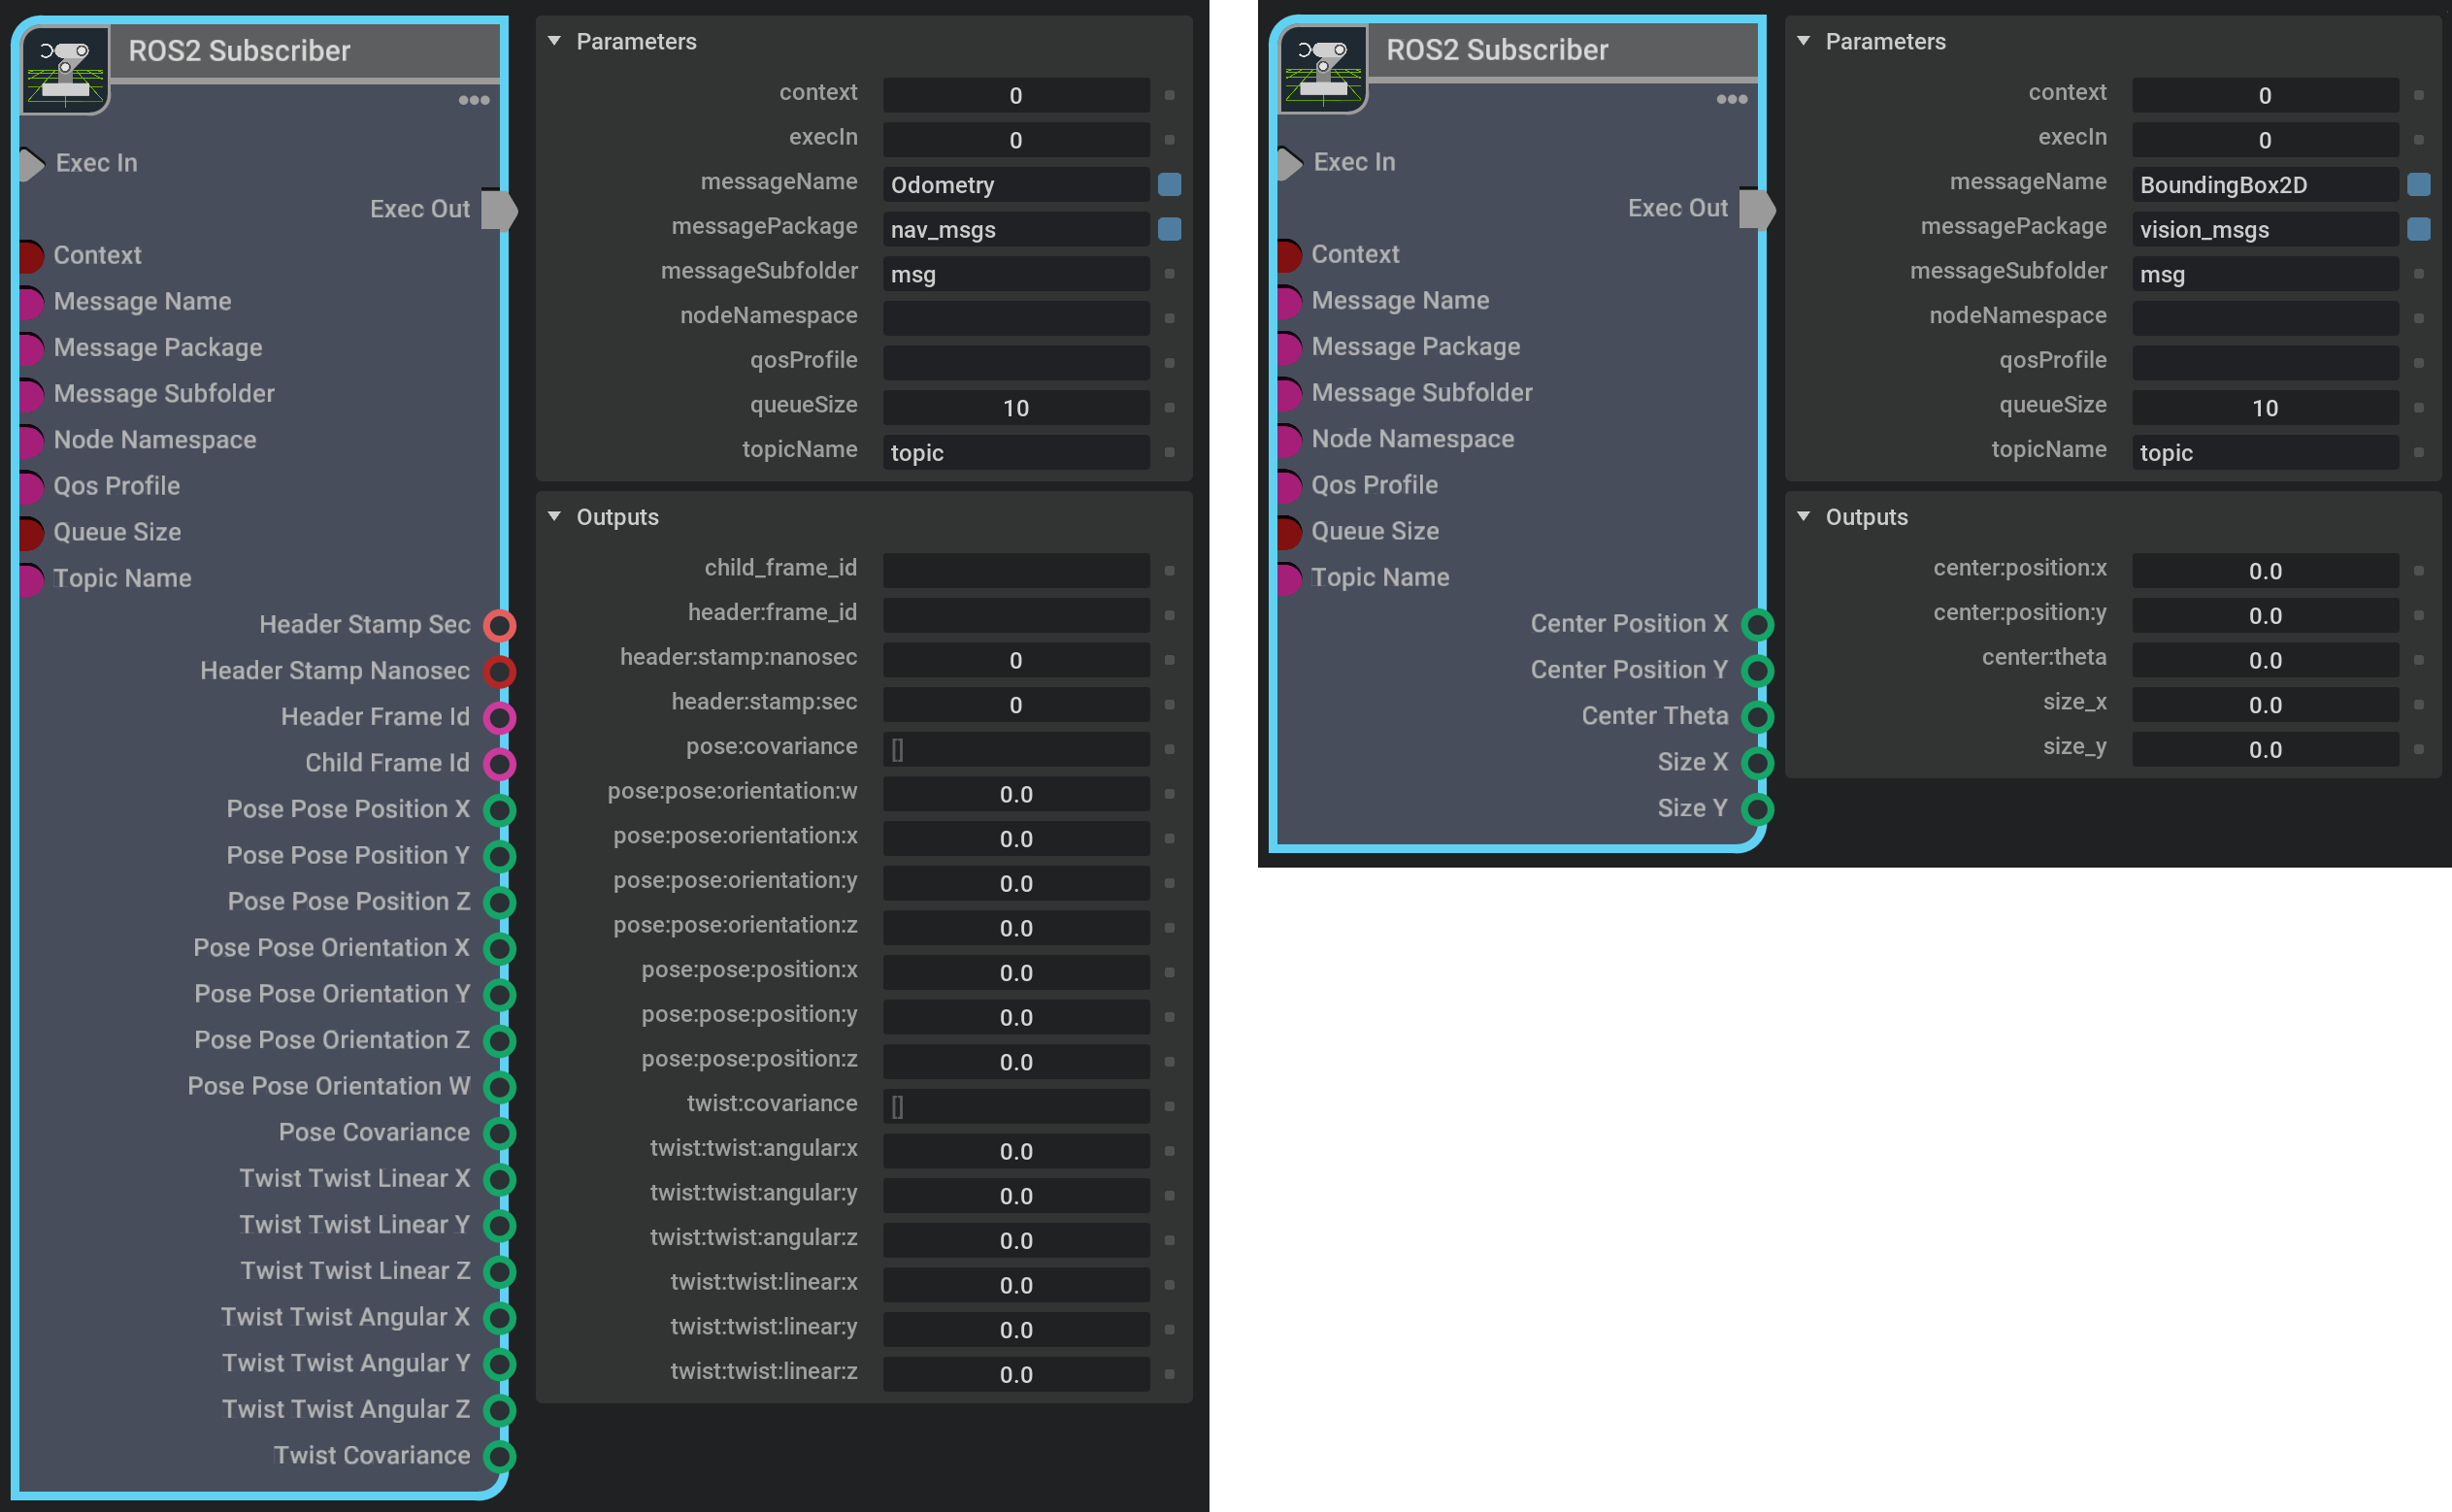
Define, in the node Property panel, the message type following the next pattern: messagePackage/messageSubfolder/messageName. When a valid (existing) message type is defined, the node will reconfigure its output attributes in order to get the subscription values.
Note
The node output attributes reconfiguration in OmniGraph follows the next rules:
Fields of ROS 2 type embedded message (e.g.: std_msgs/Headerheader) are un-rolled in new attributes.
Fields of ROS 2 type array of embedded message (e.g.: geometry_msgs/Point32[]points) are treated as a unique attribute of type token array. Each token is encoded as JSON.
Hint
It is not necessary to play the simulation to (re)configure the node’s output attributes for different message types.
Example of the node output attributes reconfiguration for different message types:
Connect the node outputs to the inputs of other nodes to consume the received data..
Play the simulation to get subscriptions when they are available in the ROS 2 environment.
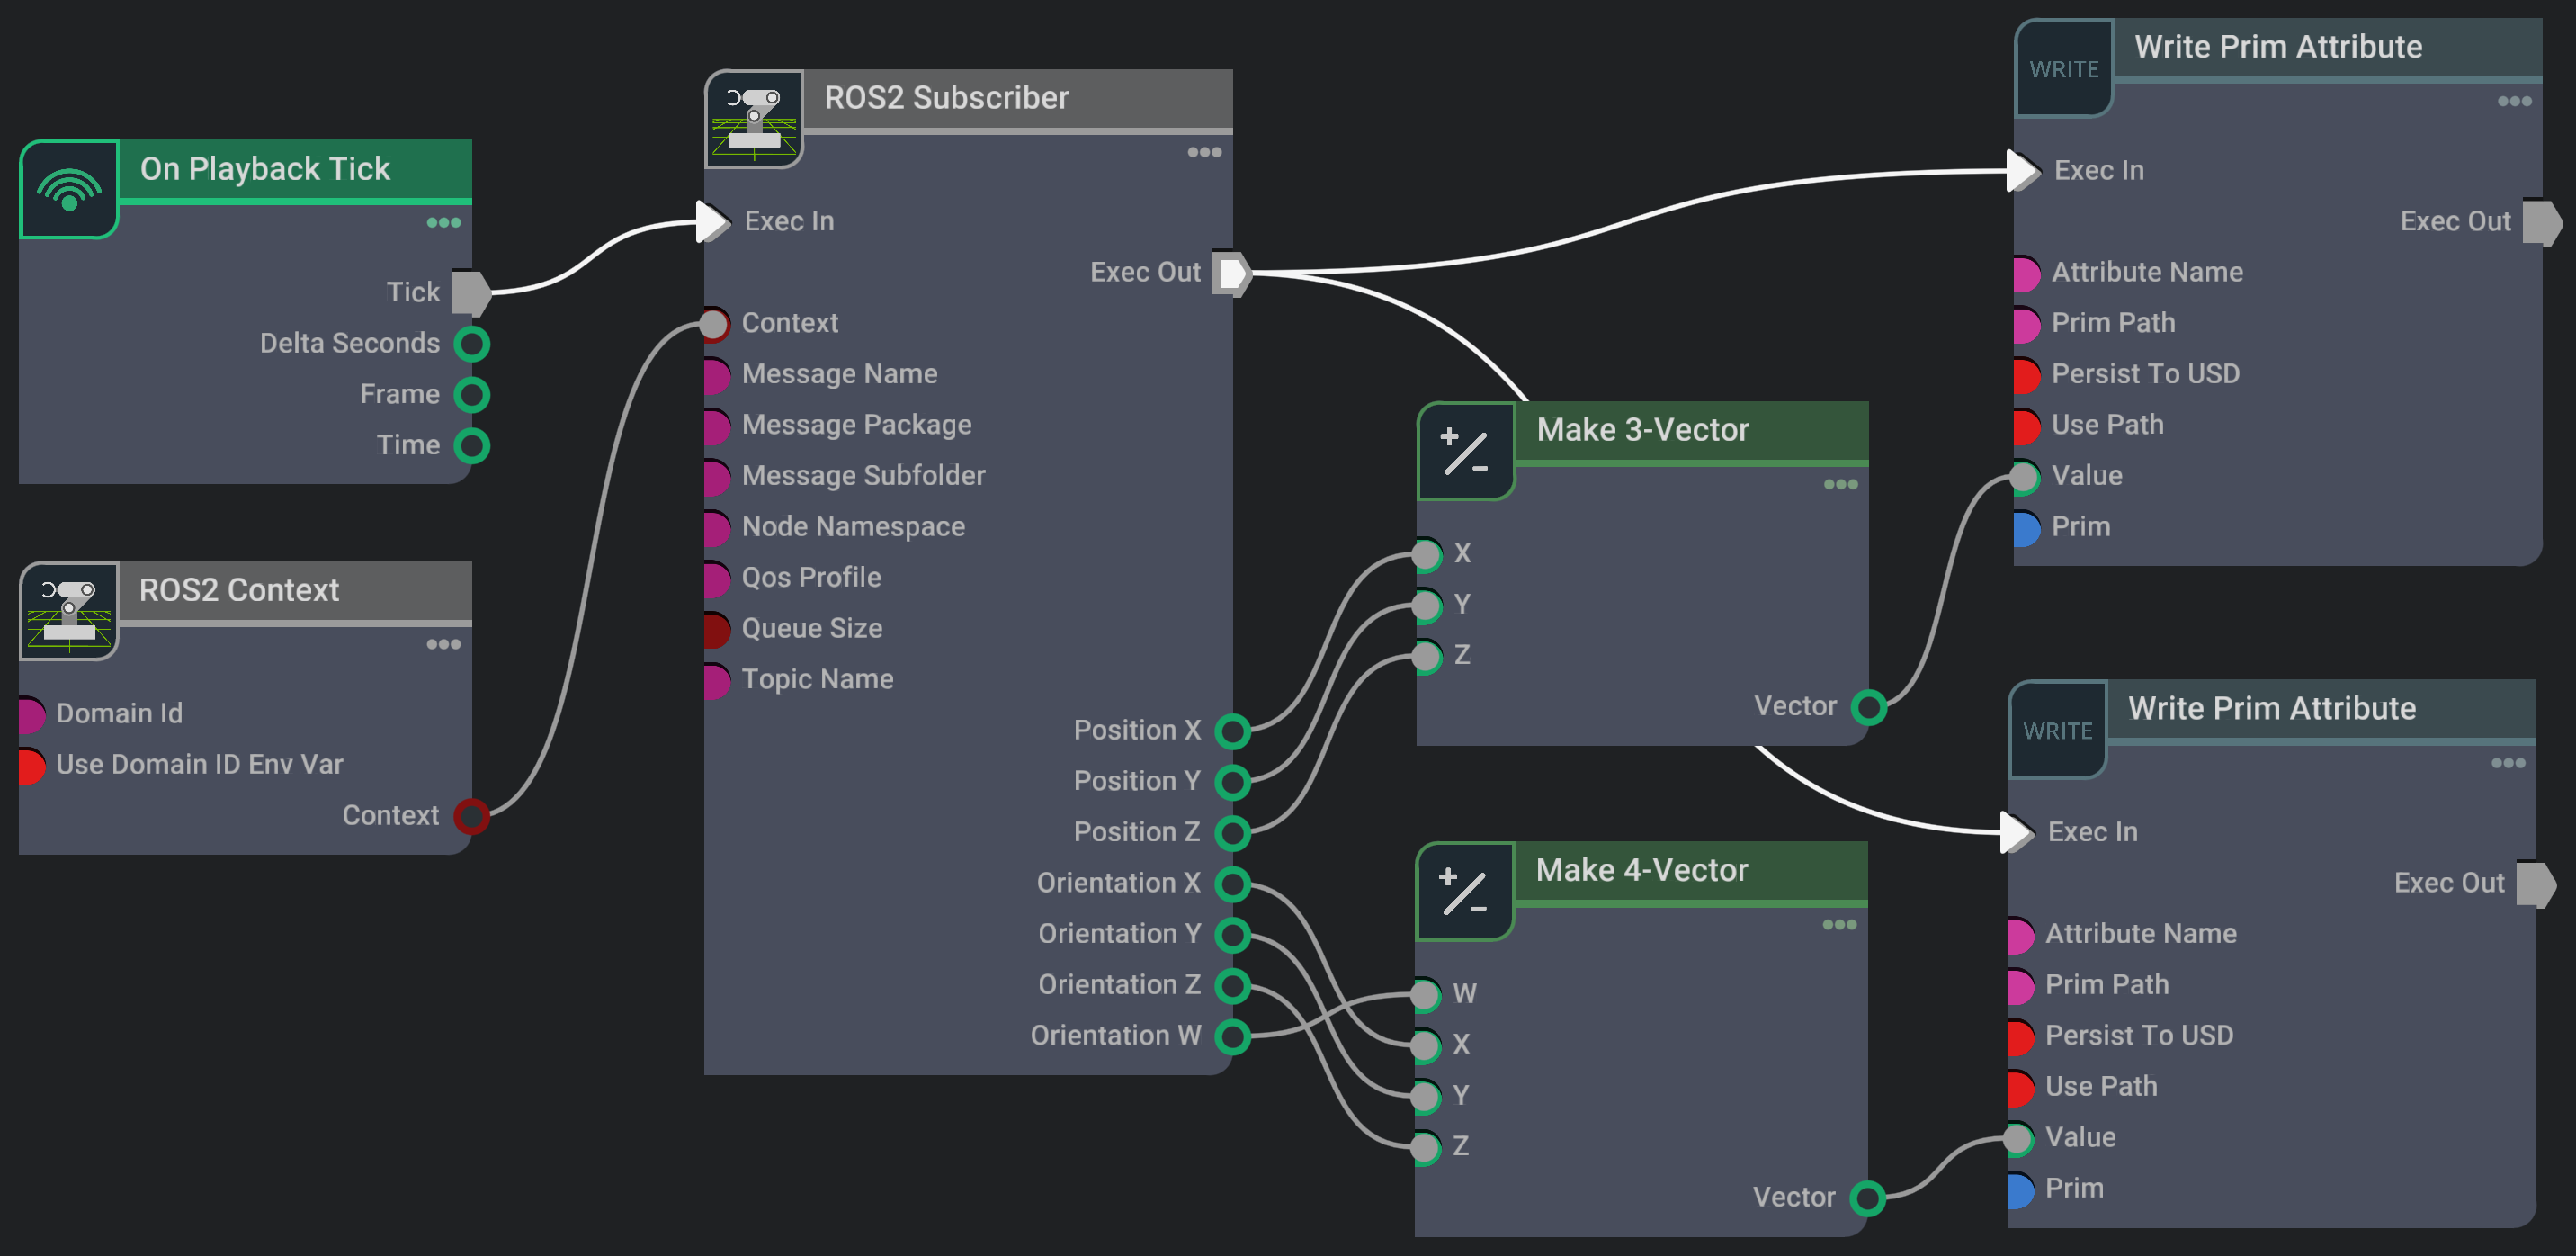
The following example shows how to create a subscription to the topic /object_pose, with the ROS 2 message type geometry_msgs/msgs/Pose, to teleport an object to the received pose using the generic ROS2 Subscriber node.
In a new stage, create an object (Cube) using the Create > Shape > Cube menu.
Go to Create > Visual Scripting > Action Graph to create an Action Graph and add, connect and configure the following OmniGraph nodes into the Action Graph:
On Playback Tick node to execute other graph nodes every simulation frame.
Write Prim Attribute node to set a specific prim attribute values.
Make 3-Vector node to create a three-component vector from individual components.
ROS2 Context node to create a context using either the given Domain ID or the ROS_DOMAIN_ID environment variable.
ROS2 Subscriber node to subscribe to a ROS 2 topic of any message type.
Parameters:
Node
Input field
Value
ROS2 Subscriber
messagePackage
geometry_msgs
messageName
Pose
topicName
object_pose
Write Prim Attribute
(upper node)
Prim
/World/Cube
Attribute Name
xformOp:translate
Write Prim Attribute
(lower node)
Prim
/World/Cube
Attribute Name
xformOp:orient
Play the simulation to get subscriptions when they are available in the ROS 2 environment.
Use the following command in a new ROS2-sourced terminal to teleport the object in Isaac Sim to the specified pose:
In this tutorial we learned how to publish any available message type to a ROS 2 topic as well as how to subscribe to a ROS 2 topic of any available message type.
Continue on to the next tutorial in our ROS 2 Tutorials series, ROS 2 Service for Manipulating Prims Attributes to learn how to create ROS 2 services to list prims and their attributes, as well as to read and write a specific prim attribute.