ROS 2 Ackermann Controller#
Learning Objectives#
In this example, we will drive a forklift by subscribing to a AckermannDriveStamped message through the ROS network. We will learn to
Setup Articulation and Ackermann controllers to a forklift
Setup the robot to be driven by a ROS2 AckermannDriveStamped message
Getting Started#
Important
Make sure to source your ROS 2 installation from the terminal before running Isaac Sim. If sourcing ROS 2 is a part of your bashrc then Isaac Sim can be run directly.
Prerequisite
This ROS2 Ackermann Controller sample is only supported on ROS2 Foxy and Humble.
The ackermann_msgs ROS2 package is required to run this sample. To install this package run the following command:
sudo apt install ros-humble-ackermann-msgs
Warning
ROS 2 Foxy is no longer tested or supported. This may result in potential issues when ROS 2 Foxy is used in conjunction with Isaac Sim 4.2 or later. ROS 2 Foxy Isaac Sim tutorial packages will be removed in a future release.
sudo apt install ros-foxy-ackermann-msgs
Enable the
omni.isaac.ros2_bridgeExtension in the Extension Manager window by navigating to Window > Extensions.This tutorial requires
isaac_tutorialsROS2 package which is provided in IsaacSim-ros_workspaces repo. Complete ROS and ROS 2 Installation to make sure the ROS2 workspace environment is setup correctly.
Ackermann Controller and Drive Setup#
In a new stage, create the Flat Grid environment by going to Create -> Isaac -> Environments -> Flat Grid.
Add the Forklift C robot by going to Create -> Isaac -> Robots -> Wheeled Robots -> Forklift -> Forklift C.
Create a new action graph by navigating to Window > Visual Scripting > Action Graph and then in the Action Graph panel, select New Action Graph.
Now add the following nodes to the graph and connect them as shown:
On Playback Tick node to execute other graph nodes every simulation frame.
ROS2 Context node to create a context using either the given Domain ID or the
ROS_DOMAIN_IDenvironment variable.Isaac Compute Odometry Node node to compute the robot’s current linear speed.
Ackermann Controller node to compute individual wheel steering angles and wheel speed.
ROS2 Subscribe AckermannDrive node to subscribe to Ackermann drive commands.
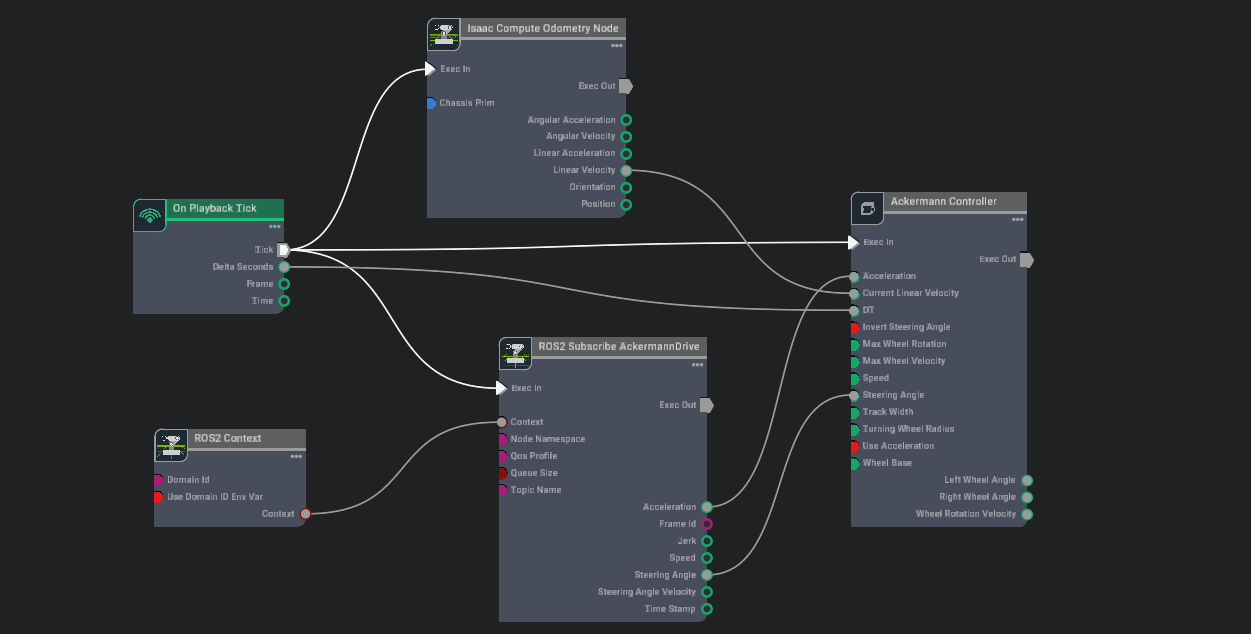
In the Property tab for the Isaac Compute Odometry Node:
Add the Forklift prim (ie.
/Forklift) to its chassisPrim input field. This node calculates the position of the robot relative to its start location. Its linear velocity output will be fed into the Ackermann Controller node.
In the Property tab for the ROS2 Subscribe AckermannDrive node:
Ensure the topicName input field is set to
ackermann_cmd.
In the Property tab for the Ackermann Controller node set inputs as shown in the table below:
Input Field
Value
invertSteeringAngle
True
maxWheelRotation
0.69813
maxWheelVelocity
20.0
trackWidth
0.82
turningWheelRadius
0.255
useAcceleration
True
wheelBase
1.65
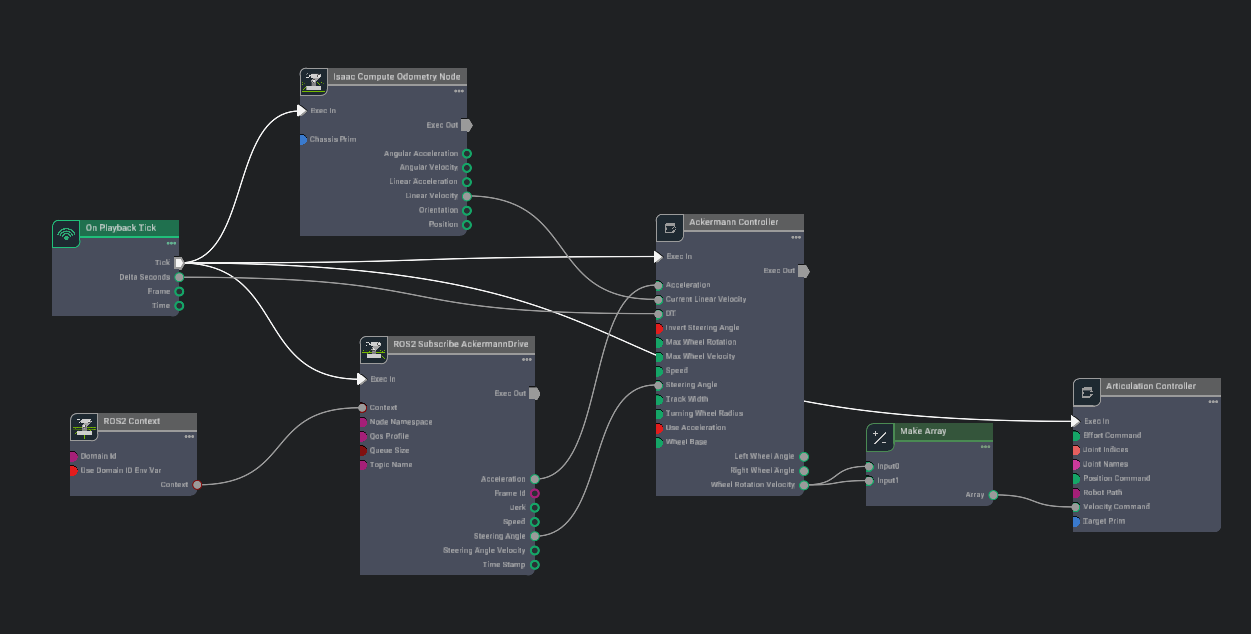
Add the following nodes to the graph and modify them as explained:
Articulation Controller node to manipulate the wheels of the forklift. In the Property tab:
Add the Forklift prim (ie.
/Forklift) to its targetPrim input field.For the jointNames input field:
Click the Add Element button and enter
left_back_wheel_jointin the text field that appears.click the Add Element button again and enter
right_back_wheel_jointin the text field that appears.
Make Array node to create an array of wheel rotation velocities to feed into the articulation controller. In the Property tab:
Under the input0 field click the plus icon to add a second input.
Now connect the nodes as shown:
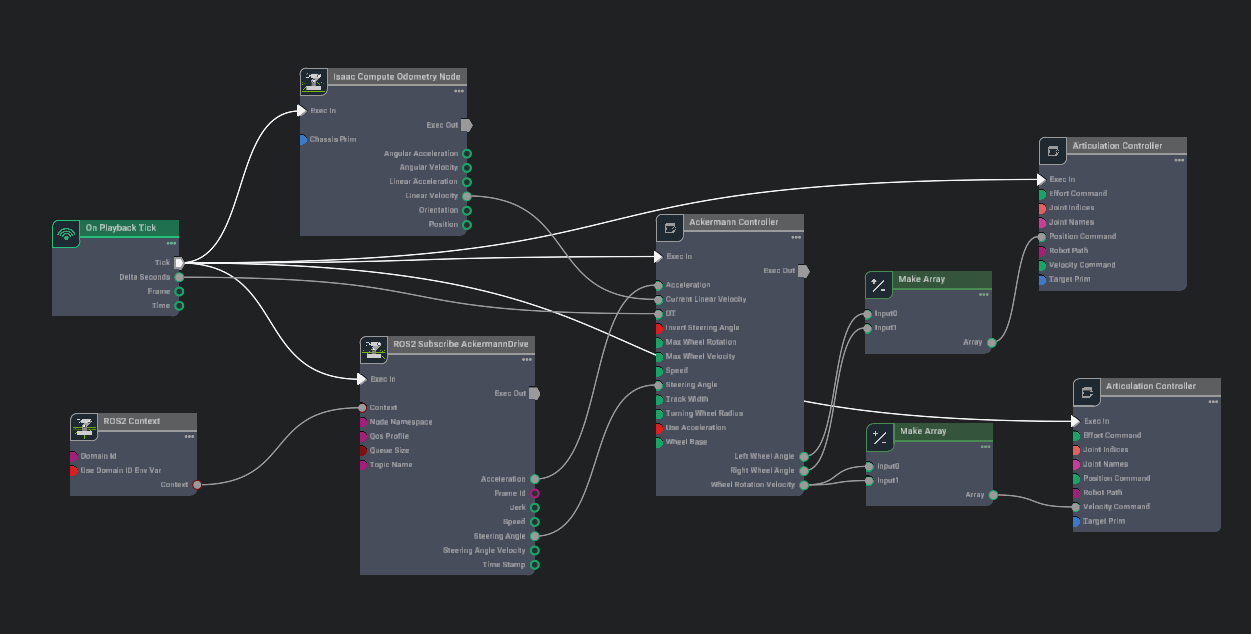
Add another set of these nodes to the graph and modify them as explained:
Articulation Controller node to manipulate the steering angle of the forklift wheels. In the Property tab:
Add the Forklift prim (ie.
/Forklift) to its targetPrim input field.For the jointNames input field:
Click the Add Element button and enter
left_rotator_jointin the text field that appears.click the Add Element button again and enter
right_rotator_jointin the text field that appears.
Make Array node to create an array of wheel angles to feed into the articulation controller. In the Property tab:
Under the input0 field click the plus icon to add a second input.
Now connect the nodes as shown:
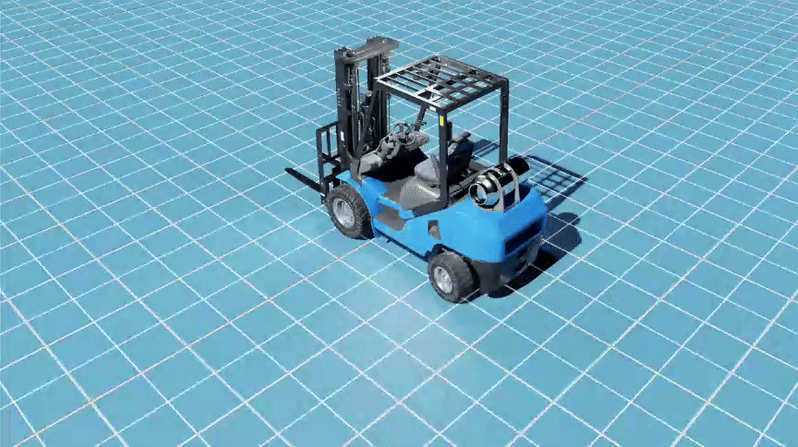
Hit Play in Isaac Sim to start simulation.
In a new terminal, ensure your Isaac Sim ROS workspace is sourced and run the following node to start publishing Ackermann commands.
ros2 run isaac_tutorials ros2_ackermann_publisher.py
The forklift should move similarly to the one below:
Summary#
This tutorial covered
Creating and setting up Ackermann Controller node and with articulation controller nodes.
Adding a ROS2 AckermannDriveStamped subscriber node which feeds commands into the Ackermann Controller node.
Next Steps#
Continue on to the next tutorial in our ROS2 Tutorials series, ROS 2 Launch.