Assembling Robots And Rigid Bodies#
Learning Objectives#
This tutorial shows how to use the omni.isaac.robot_assembler extension to assemble two USD assets into a single rigid body. This tutorial will primarily demonstrate the use of the Robot Assembler UI tool. By the end of this tutorial, the user will understand the physical mechanics of assembled bodies, when to use the Robot Assembler, and the current limitations with assembling rigid bodies in Omniverse Isaac Sim.
5-10 Minutes Tutorial
Getting Started#
In order to find this tutorial of use, the user should have two USD assets that they wish to assemble into one. This may include:
A robot arm that needs to be attached to a gripper.
A robot that needs to be fixed to a moving base.
The use of the word ‘robot’ here indicates a USD asset that can be classified as an Articulation (a rigid body with controllable degrees of freedom). This is covered in Rigging Robots.
Understanding the Mechanics of Assembled Bodies#
The Robot Assembler tool allows a user to combine two USD assets together by a physically simulated fixed joint. The result is a new USD asset that can be saved and loaded without needing to use the Robot Assembler each time. The fact that the fixed joint is physically simulated is key in understanding proper application of the Robot Assembler extension. In Omniverse, physics is only simulated while the timeline is playing. When physics is not active, the fixed joint will not have any effect. The Robot Assembler should only be used to combine USD assets that are going to be moving while the timeline is playing. For example, a robot that is fixed in place on a static table does not need to have a fixed joint connecting it to the table; the user can simply place both the robot and the table independently of each other and they will stay in place once the timeline is played.
Additionally, because two assembled assets are attached via a physically simulated fixed joint, the position of one asset relative to another is resolved by a physics solver. This solution is easy if the assets are already placed correctly relative to each other while the timeline is stopped, but the user may experience instability if, on a stopped timeline, they move one part of an assembled asset far away from the other and start the timeline.
Using the Robot Assembler Tool#
Assembling Robots#
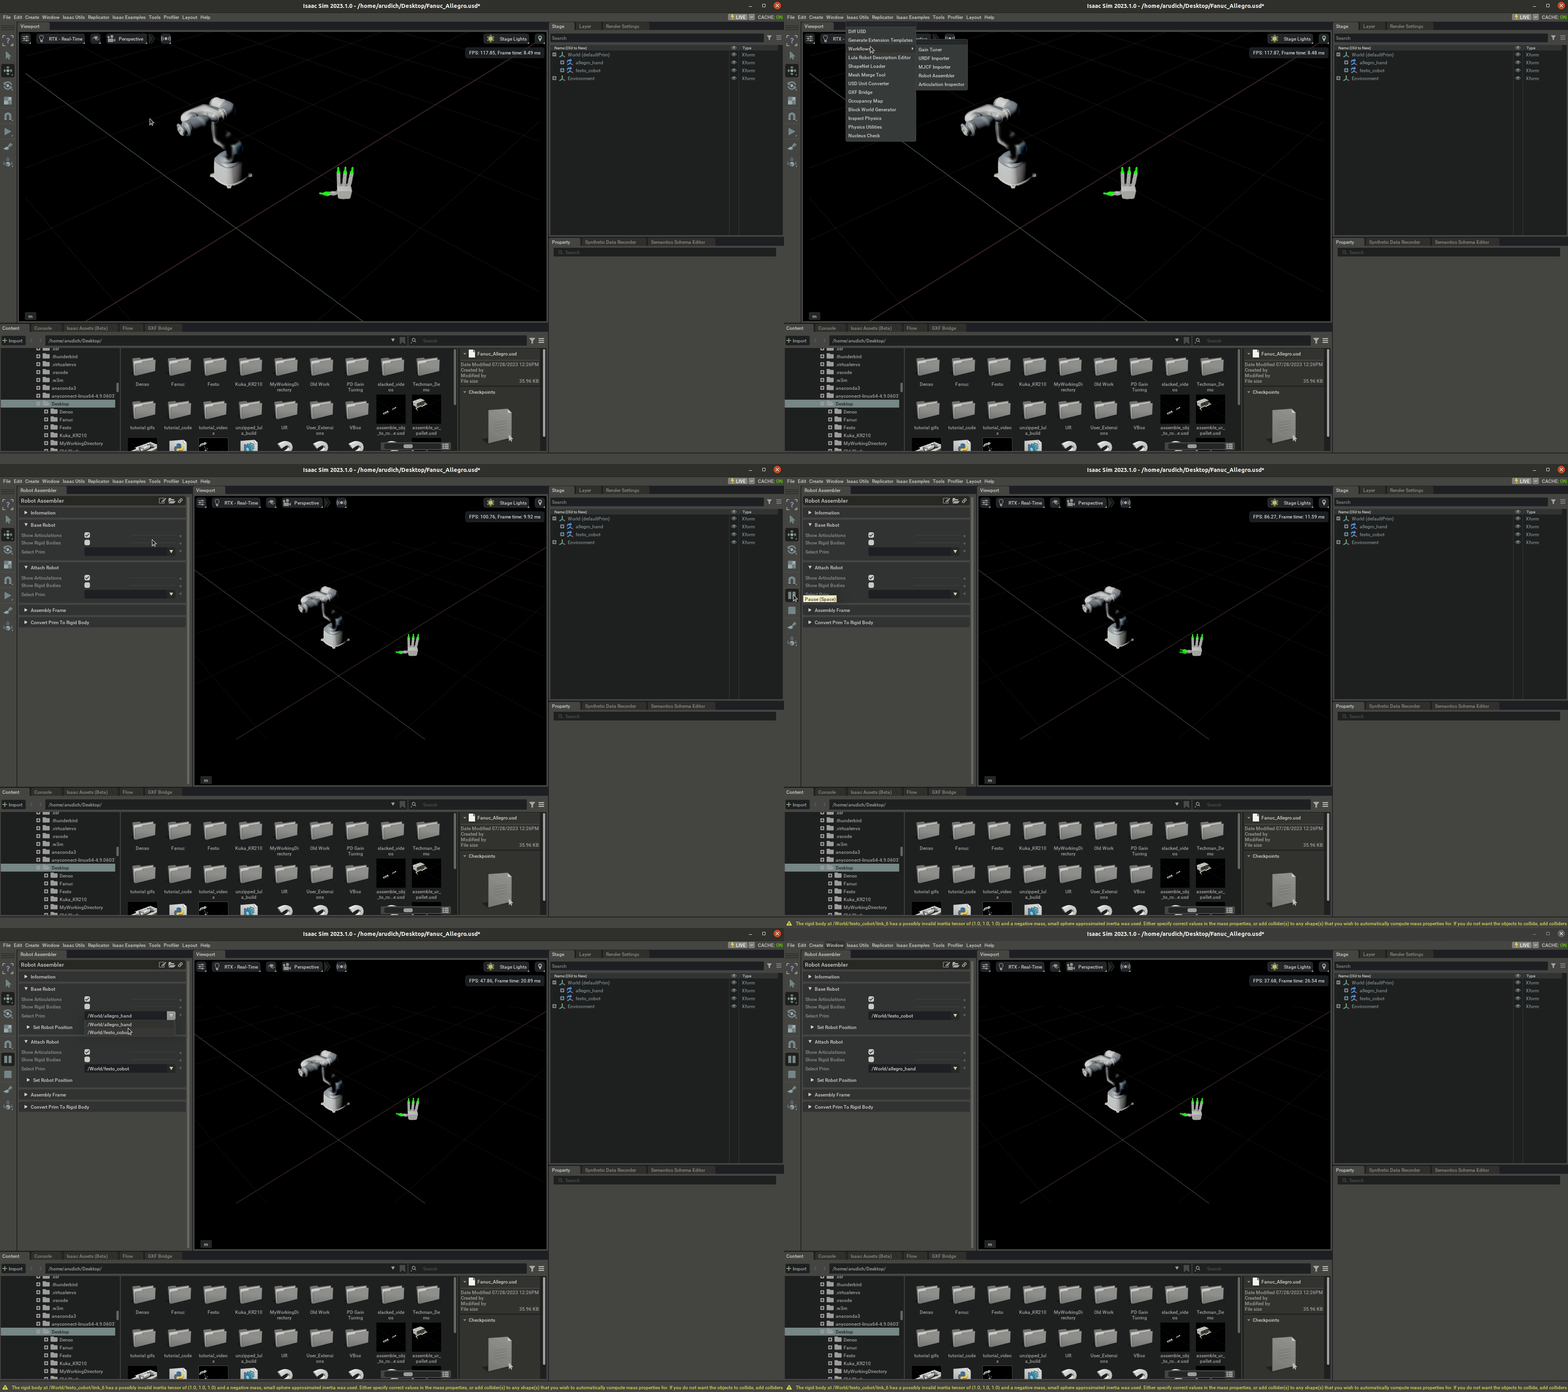
The Robot Assembler UI tool can be found in the Omniverse Isaac Sim toolbar by under Isaac Utils -> Workflows -> Robot Assembler. To use the Robot Assembler, you may start by loading the assets you wish to assemble onto the USD stage and pressing the PLAY button in the left-hand toolbar.

You will now be able to select a “Base Robot” and an “Attach Robot”. The “Attach Robot” will become a floating body with its position determined by the frame it is attached to on the “Base Robot”.
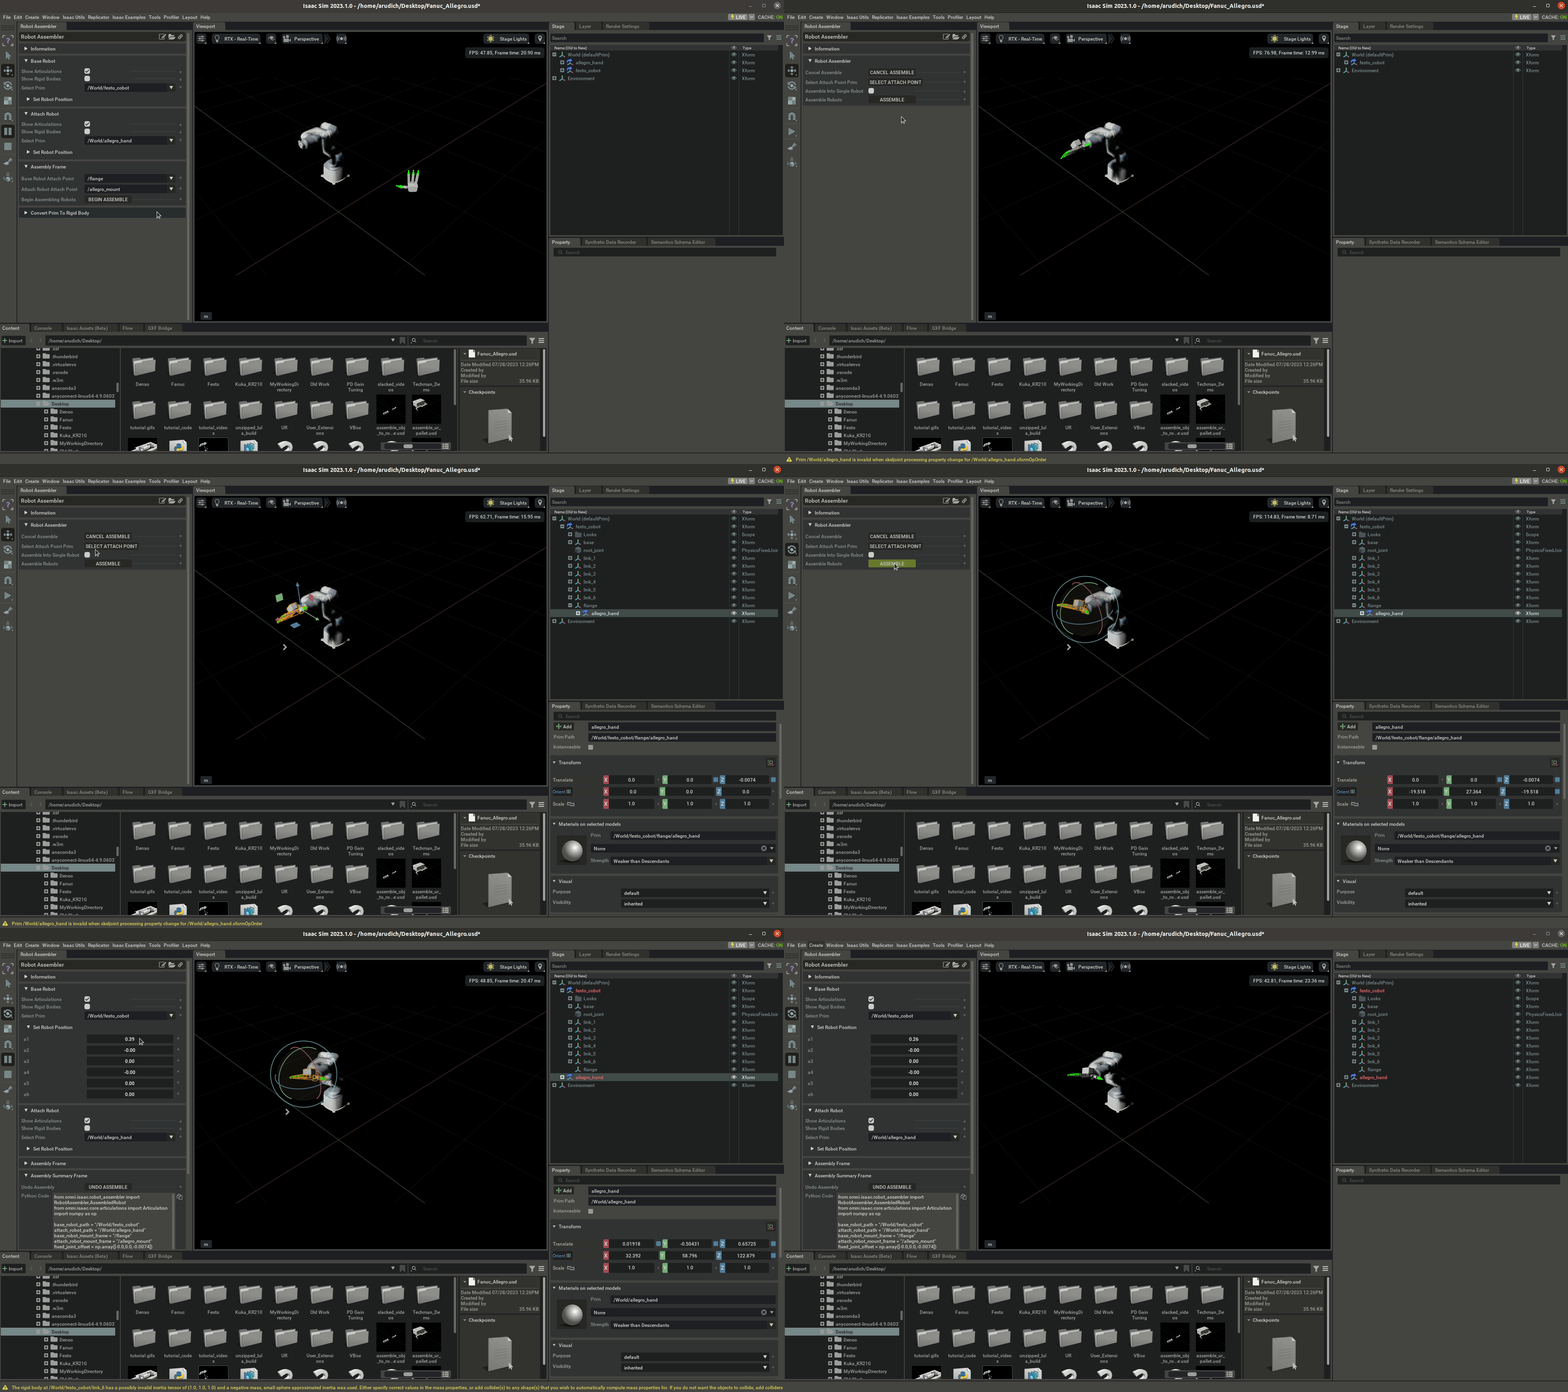
Upon selection, both Articulations can be moved around using the “Set Robot Position” field. This is a good way to make sure that the Articulations being assembled are working as expected both before and after the assembly. It is worth checking before assembly that the joints on both robots are controllable using the Set Robot Position field.
Once two robots have been selected, the “Assembly Frame” will become accessible to the user. This will allow the user to select the two frames at which they would like to attach the robots. After choosing appropriate frames, click “BEGIN ASSEMBLE”. In the next frame, you may specify a fixed translation and rotation between the selected frames by clicking the “SELECT ATTACH POINT” button and editing the selected Xform Prim on the stage. Once you are happy with the fixed transform, you may click “ASSEMBLE” to finalize.

The two robots are now attached by a user-defined fixed joint. When the “Base Robot” moves, the “Attach Robot” moves along with it. In order to control the resulting robot through code, the user may use the Articulation class as usual, with the prim path of the “Base Robot” being used to control the DOFs of the base robot, and the prim path of the “Attach Robot” to control the DOFs of the attach robot.
While in the assembly frame, you may also check a box to indicate that two Articulations should be treated as a single robot. This will result in the all of the DOFs of each robot being controllable from the prim path of the “Base Robot”. This can also lead to more stable physical simulation.
Assembling Other Rigid Bodies#
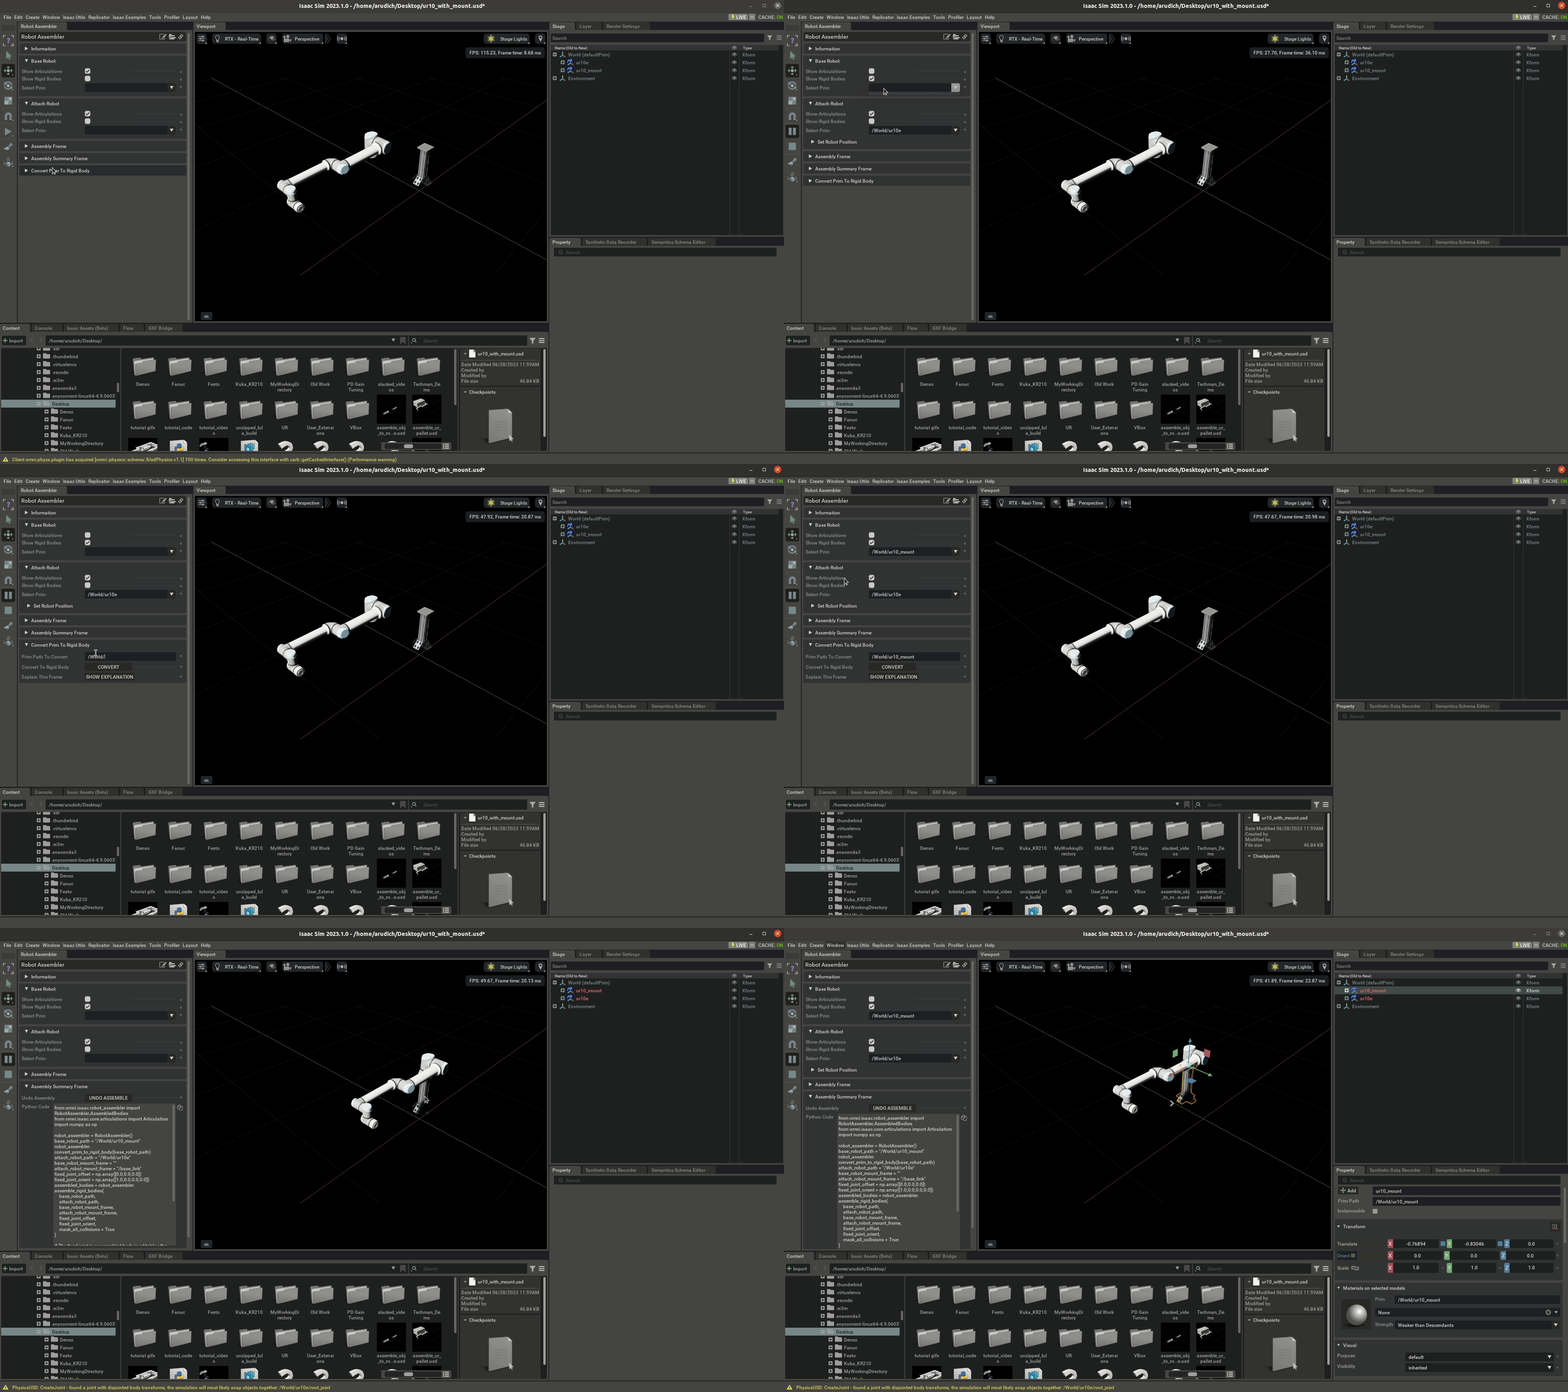
This tool may also be used to attach any two USD assets to each other. In order to physically simulate a fixed joint, the two bodies being combined must have physics applied to them. Articulations already have physics applied, but a USD mesh of a mount may be purely visual. The Robot Assembler extension allows you to convert USD assets to rigid bodies with applied physics in the “Convert Prim To Rigid Body” frame.
In the “Base Robot” and “Attach Robot” frames, you can filter for rigid bodies that aren’t Articulations. In the video below, a mount for the UR10 is on the stage, but it is just a mesh without any applied rigid body physics. Using the “Convert Prim To Rigid Body Frame”, the mesh has physics applied to it, and can now be attached to the UR10. After this conversion is complete, the two assets can be assembled in the same way as two robots.

Assembly Summary Frame#
After two bodies are assembled together, the “Assembly Summary Frame” will expand with a code snippet that replicates exactly the operations that the user performed through the Robot Assembler UI. I.e. if the user loaded some USD stage and assembled two bodies, the code snippet provided would perform the same assembly after loading the same stage. In the case of the Fanuc and Allegro hands attached in Assembling Robots, the following code snippet is generated.
 1from omni.isaac.robot_assembler import RobotAssembler,AssembledRobot
 2from omni.isaac.core.articulations import Articulation
 3import numpy as np
 4
 5base_robot_path = "/World/festo_cobot"
 6attach_robot_path = "/World/allegro_hand"
 7base_robot_mount_frame = "/flange"
 8attach_robot_mount_frame = "/allegro_mount"
 9fixed_joint_offset = np.array([0.0,0.0,0.0])
10fixed_joint_orient = np.array([1.0,0.0,0.0,0.0])
11single_robot = False
12
13robot_assembler = RobotAssembler()
14assembled_robot = robot_assembler.assemble_articulations(
15        base_robot_path,
16        attach_robot_path,
17        base_robot_mount_frame,
18        attach_robot_mount_frame,
19        fixed_joint_offset,
20        fixed_joint_orient,
21        mask_all_collisions = True,
22        single_robot=single_robot
23)
24
25# The fixed joint in a assembled robot is editable after the fact:
26# offset,orient = assembled_robot.get_fixed_joint_transform()
27# assembled_robot.set_fixed_joint_transform(np.array([.3,0,0]),np.array([1,0,0,0]))
28
29# And the assembled robot can be disassembled, after which point the AssembledRobot object will no longer function.
30# assembled_robot.disassemble()
31
32# Controlling the resulting assembled robot is different depending on the single_robot flag
33if single_robot:
34        # The robots will be considered to be part of a single Articulation at the base robot path
35        controllable_single_robot = Articulation(base_robot_path)
36else:
37        # The robots are controlled independently from each other
38        base_robot = Articulation(base_robot_path)
39        attach_robot = Articulation(attach_robot_path)
Collision Masking#
When a fixed joint is created between two rigid bodies, the Robot Assembler also masks collisions between those two bodies in order to prevent contradictory physics constraints where the collision meshes in the frames being attached collide, but the body cannot move because of the new fixed joint. Some users may want to only mask collisions between the frames that are forced to collide by the fixed joint, and to allow collisions between the rest of the bodies. To accomplish this, you can change the mask_all_collisions flag to False in the code snippet provided by the “Assembler Summary Frame”, and then mask specific collision pairs manually via assembled_robot.mask_collisions(prim_path_a:str, prim_path_b: str). This will mask collisions only between the frames specified by the given prim paths.
Summary#
In this tutorial, we learned that:
The Robot Assembler tool exists to attach two robots or rigid bodies via a user-specified fixed joint.
The Robot Assembler creates a fixed joint that is physically simulated, and so it will only be active while the timeline is playing.
The Robot Assembler is only needed to attach bodies that are expected to move while the timeline is playing.
The Robot Assembler can also be accessed by a Python API that is demonstrated upon using the UI tool to assemble a pair of robots.