Maya (Legacy) Connector#
Overview#
Warning
The Maya Legacy Connector is no longer supported. All users should move to Maya Native.
The NVIDIA Omniverse™ Maya Connector plugin enables Maya Users to import and export USD data with MDL materials.
We recommend customers use the Autodesk Maya USD plugin. To learn more about the Autodesk USD for Maya, see the Autodesk USD for Maya getting started page.
Please see Autodesk USD for Maya Getting Started for more information.
Package Files: Tutorial Package
Compatible Versions#
The Omniverse Maya Legacy connector is compatible with the following versions of Maya.
Version |
USD Version |
Windows |
Linux (not tested) |
|---|---|---|---|
2022.4 (not tested) |
USD 21.11 |
Yes |
CentOS 7.9 |
2023.3 (not tested) |
USD 21.11 |
Yes |
CentOS 7.9 |
2024.2 |
No connector use USD for Maya GitHub |
Yes |
Yes |
2025.3 |
No connector use USD for Maya GitHub |
Yes |
Yes |
USD for Maya 2025 support
We recommend the Autodesk USD for Maya 2025 plugin for Import and Export support. Learn more here.
Note
Known Limitation - Other USD plugins must be uninstalled for Omniverse Maya Connector to function properly. For Maya 2023, Bifrost must also be disabled for compatibility.
Install Instructions#
Shut down Maya
Uninstall the Maya Native Connector if it is currently installed.
Uninstall Maya USD if it is installed. This can be done from Windows Add/Remove Programs.
Uninstall Bifrost if it is installed. This can be done from Windows Add/Remove Programs.
Follow our Connector installation instructions to install this connector.
Start Maya
In Maya Main Menu / Windows / Plug-in Manager, enable OmniMayaLoader
User Interface#
Warning
The Maya Legacy Connector is no longer supported. All users should move to Maya Native.
Signing-In#
Once the plug-in is installed, users must sign into an Omniverse server. Users can do so from two places in the Maya plugin:

Connections are made to Omniverse via the connection dialog.
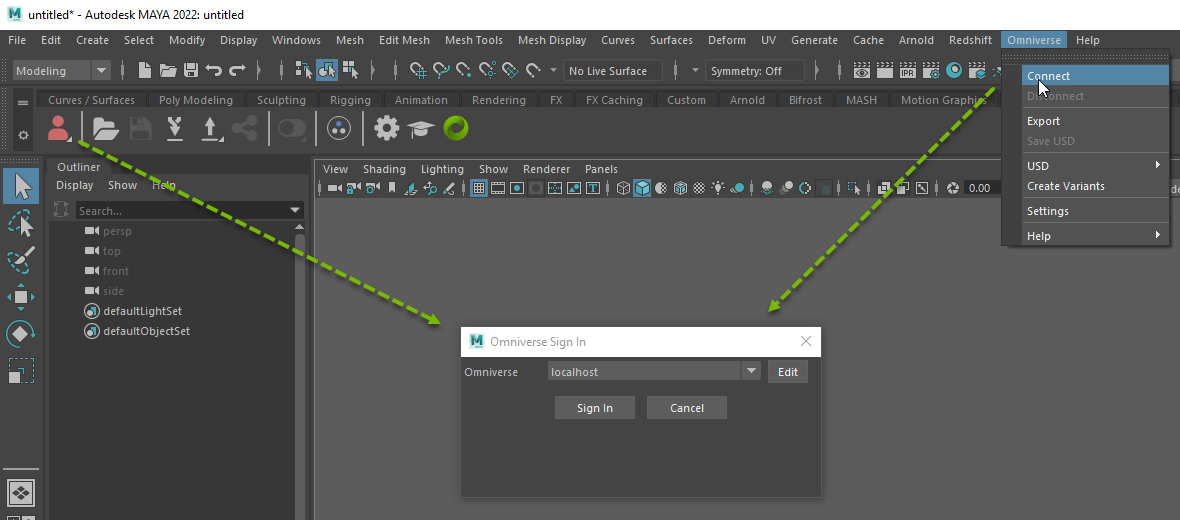
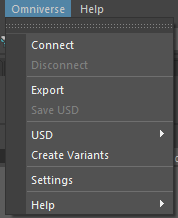
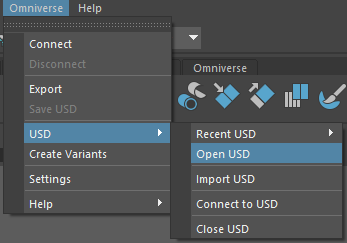
Users can take 2 routs to the connection window. 1. From the Omniverse Main Menu drop-down users can go directly to the connect menu. 2. From the Omniverse Shelf you can quickly get to the connect menu.
Menu Items |
Action |
|---|---|
Username |
Your Omniverse Username |
Server Information |
The address to your Omniverse Nucleus |
Note
The server address field will store and auto-populate known recent servers.
After the NVIDIA Omniverse™ Maya Connector plugin has been loaded and signed in to, users can now Live Sync, Open Omniverse Nucleus / Local USD files, and Export USD files to your Omniverse Nucleus.
USD Export File Browser#
Exporting files from Maya is done through the Export File Dialog.
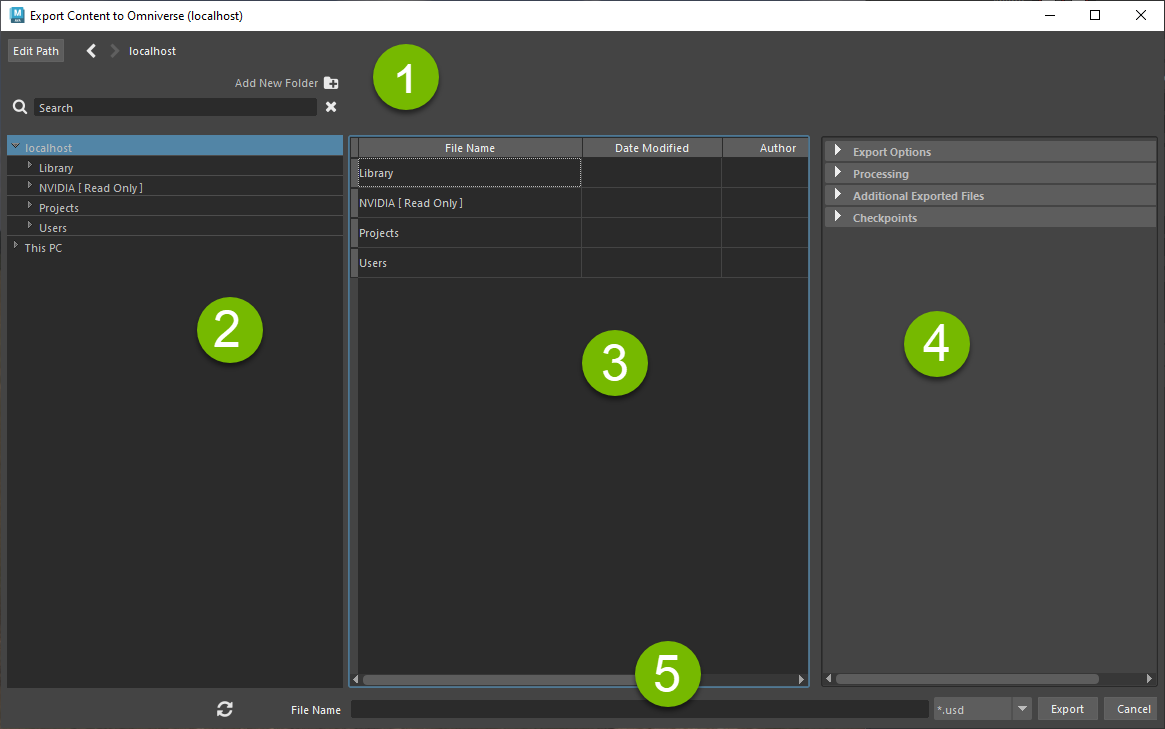
Ref# |
Menu Items |
Definition |
|---|---|---|
1 |
Navigation |
There are several navigation options:
|
2 |
File Hierarchy |
Directory/File list |
3 |
Content Body |
File and directory list for the selected directory in the file hierarchy |
4 |
Export Options |
Export Options can be configured here. See below for various options. |
5 |
File information |
There are several file options:
|
Note
You can export to USDA (Ascii) format by hard typing the extension .usda on export if exporting to a local drive (not an omniverse server).
USD Export Options#
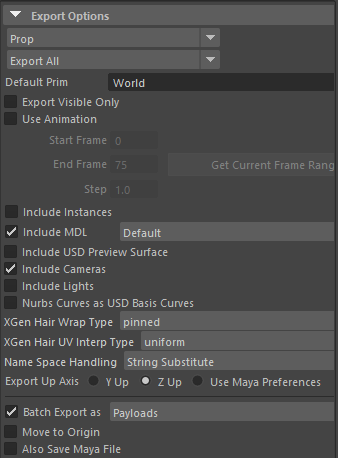
Export Options |
Definition |
|---|---|
Export Type Dropdown |
|
Export Options |
Selects what to export:
You can also configure your export with the following values: |
Use Animation |
|
Include Instances |
|
Include MDL |
|
Include Cameras |
|
Include Lights |
|
Nurbs Curves as USD Basis |
|
Include Hair Groom |
|
Name Space Handling |
|
Up Axis |
|
Batch Export |
|
Move to Origin |
|
Also Save Maya |
|
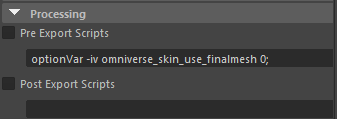
Processing Options |
Definition |
|---|---|
Pre Export Script MEL |
|
Post Export Script MEL |
|

Additional Exported Files |
Lists all associated/dependant files included in the export |

Checkpoint |
Creates a checkpoint and optional description. (For compatible servers only) |
Exporting With Maya#
Open and Import USD Browsers#
With the open and import USD functions, you can open USD content directly in Maya.
The import USD function allows users to import USD and merge it with the currently opened USD file.
Options#
To quickly get to a file, paste an Omniverse URL into the filename field and press the Enter or Open button.
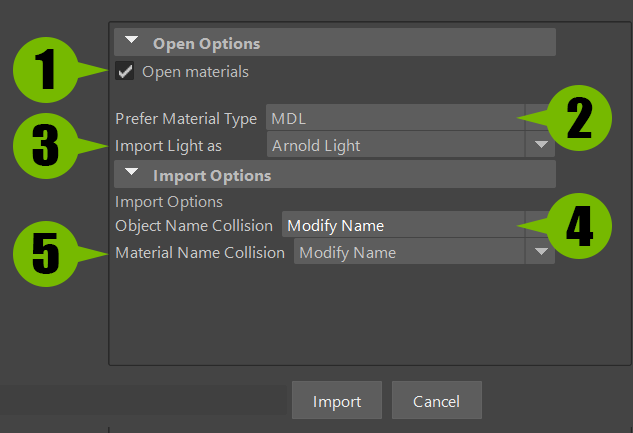
Ref # |
Option |
Result |
|---|---|---|
1 |
Open Materials |
Check to import materials. If Unchecked Materials will be ignored. |
2 |
Prefer Material Type |
Choose the render context for loading and displaying Materials in Maya:
|
3 |
Import Lights As |
Choose how lights should be imported:
|
4 |
Object Name Collision |
Choose what to do if there are naming conflicts with Imported Objects:
This option is only shown in Import dialog, not Open. |
5 |
Material Name Collision |
Choose what to do if there are naming conflicts with Imported Objects:
This option is only shown in Import dialog, not Open. |
Omniverse Shelf#
Added in 100.1
The Omniverse Shelf allows connectivity and quick access to important Omniverse Functions.

Option |
Result |
|---|---|
Connect to Omniverse |
Connects to an Omniverse Nucleus:
|
Open USD |
Opens a USD file locally or on a Nucleus |
Save USD |
Saves the current USD file. |
Import USD |
Imports a USD file into your current project. |
Export USD |
Exports current project file as a USD:
|
Share USD |
Copies the location of the USD Files, if on nucleus, this link is shareable with other permitted nucleus users. |
Live Sync |
Enables real-time “live” editing:
|
Create Variants |
Creates a USD Variant container. |
Plugin Settings |
Opens the Omniverse Plugin Settings Panel. |
Help |
Links to this documentation. |
About |
Version and Technical Information about the Plugin. |
Note
Connect, Export and Live Sync have additional options are in the right click menu.
Omniverse Settings#
The Omniverse Settings Panel allows access to some optional settings and features.
General Settings#
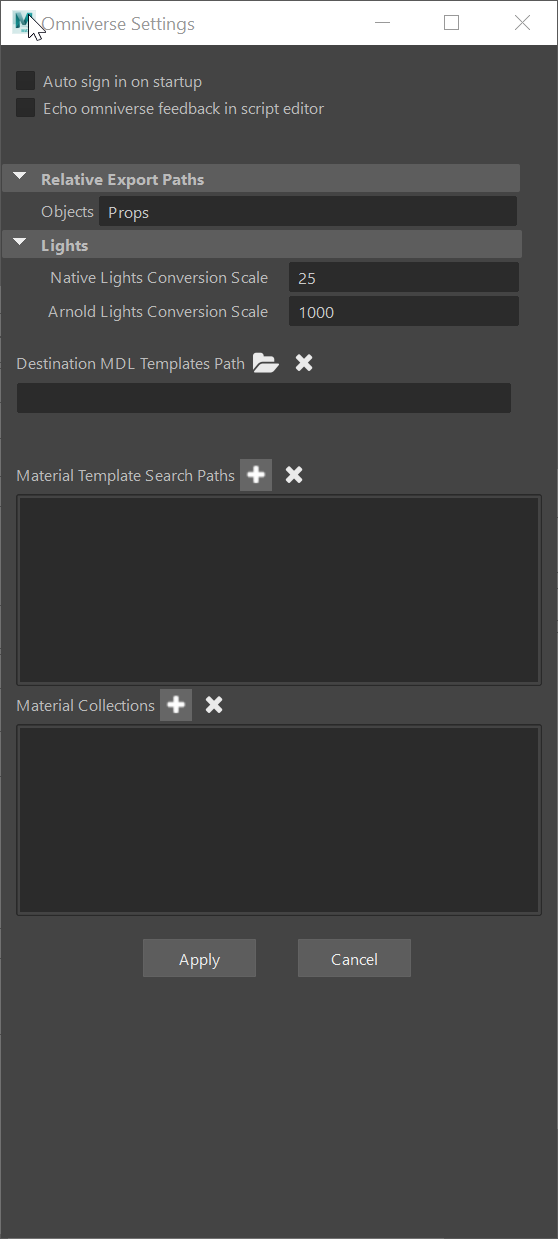
Option |
Result |
|---|---|
Auto Sign In on Startup |
Signs into previous omniverse connection automatically |
Echo Feedback |
Messages and alerts from a nucleus server will be reported in the script editor. |
Object Export Path |
Folder Name / Relative Path Option to allow customization of output organization. Used when exporting assets with the option “split into multiple files”. |
Native Light Conversion Scale |
Allows Native Maya light power to be adjusted upon conversion. |
Arnold Light Conversion Scale |
Allows Arnold Light power to be adjusted upon conversion. |
Destination MDL path |
If un-altered (blank by default) the Destination path will always be the location of the exported USD file. You can however “hard-code” a common directory where you want ALL exported USD’s to store their MDLs. |
Material Template Search Paths: |
If you or your organization have created specialized BASE MDLs, you can select their paths here. |
Material Collection Search Paths: |
If you or your organization has created Variants based on BASE MDLs you can select their locations here. |
Live Settings#
Note
For more information on Live Workflows visit. https://docs.omniverse.nvidia.com/prod_extensions/prod_extensions/ext_live.html
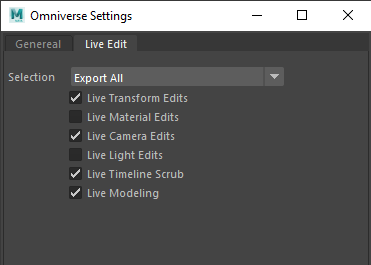
Option |
Result |
|---|---|
Selection Mode |
Defines the set of objects that are Live-Update connected |
Live Transform Edits |
If enabled, transform changes are Live updated |
Live Material Edits |
If enabled, material edits/assignments are Live updated |
Live Camera Edits |
If enabled, Camera transforms and parameters are Live updated |
Live Light Edits |
If enabled, Light transforms and parameters are Live updated |
Live Timeline Edits |
If enabled, scrubbing the timeline in 3dsMax will send the current frame as the USD file during Live update |
Live Modeling |
If enabled, modeling changes will be sent during Live Update |
Maya Legacy Functionality#
Warning
The Maya Legacy Connector is no longer supported. All users should move to Maya Native.
Functionality#
USD#
- Geometry
Static Meshes
Skeletal Meshes (usdSkel)
Animation
Point Cache
- Lights
Maya Native Lights
Arnold Lights
- Cameras
Maya Native Cameras
- Materials
MDL render context
USD Preview Surface render context
Instances
Model Variants
Other#
Open, Import, and Export USD files
Save USD only saves the delta from the last state of the USD file, preserving the unchanged parts of the USD.
- Live Mode
Live Transforms
Live Edit Mesh
Cameras edits
Lights edits for some types
Materials
- Animation
Pose Live: Pose a usdSkel while working in live mode.
Limitations & Missing Functionality#
USD#
USD Layer control
USD BlendShape partially functional.
Scope Nodes
Opening USD Point instance is not functional.
Materials#
Most common native materials are mapped on export via Universal Material Map, however, not all material have targets.
MDL node editing is not functional.
General#
Configurable Export paths
Live Sync#
Live is disabled if the target USD has animation or a different up axis than the Maya file. Duplicating a prim may not retain the prepend information, payload or reference , if used. This could result in incorrect or heavy mesh information in the USD stage.
In some cases Materials will appear to not Live Sync, depending on when the viewport textures( checker ball icon ) are turned on. To reduce the issue, turn on viewport textures once you open the usd file, other wise materials loaded before this is turned on will not sync properly.
Maya Interactive Groom Export#
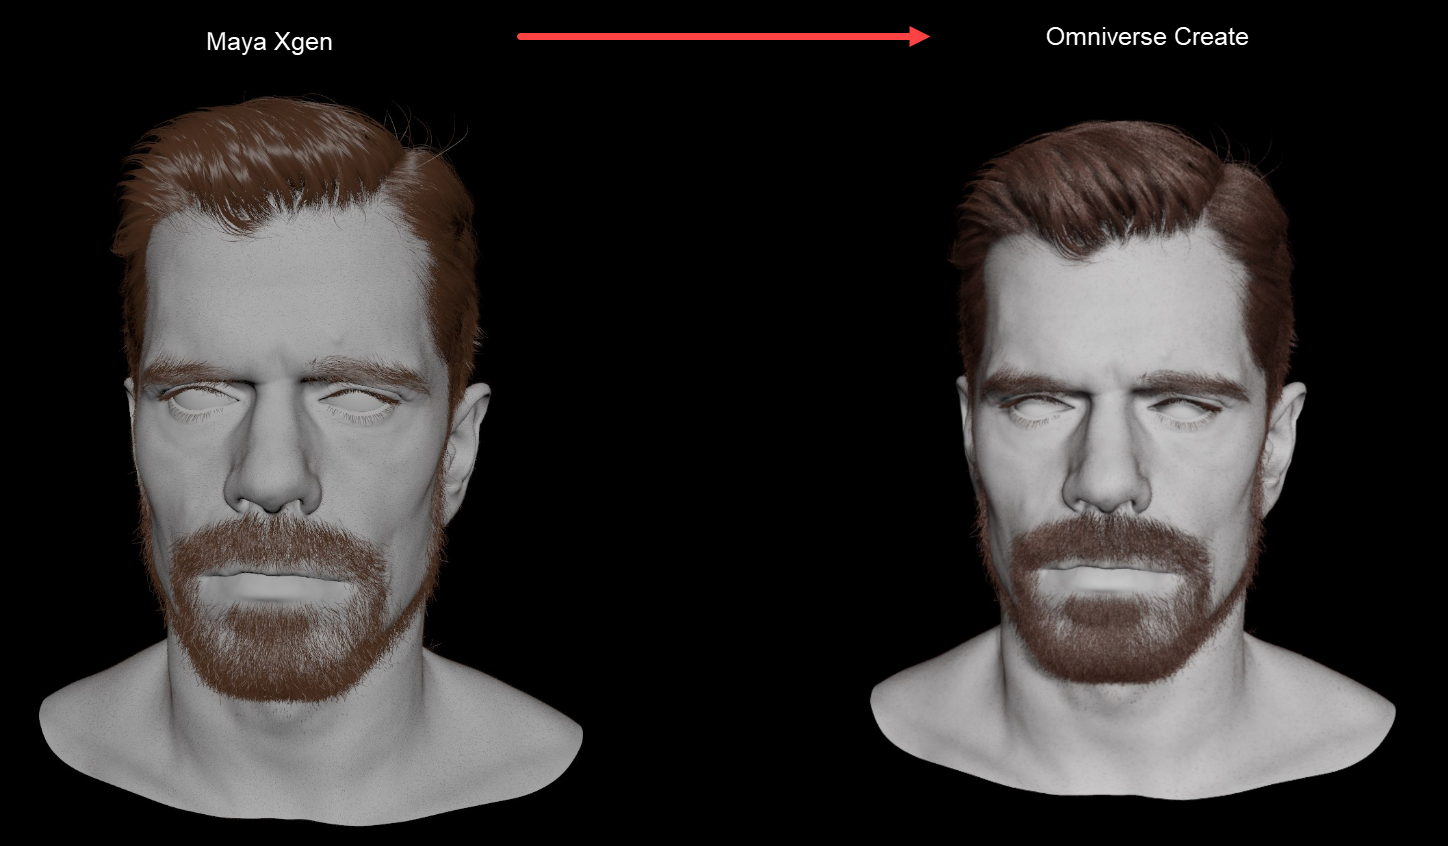
Maya Interactive Grooms from Xgen can be exported directly to USD with the Omniverse Maya (Legacy) Connector.
Export Settings#
Setting |
Options |
Description |
|---|---|---|
Wrap |
Non-periodic |
Wrap Non-periodic is a smooth open curve with two phantom points at the start/end of the curve extend from previous two points. 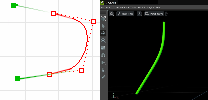
|
Wrap |
Periodic |
Wrap Periodic is a smooth closed curve. Periodic curves stay smooth when you edit them. 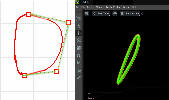
|
Wrap |
Pinned |
Wrap Pinned is a smooth open curve from linear curve points, final curve snap to start and end points without phantom points. This is a default mode for curve in Omniverse-Kit. 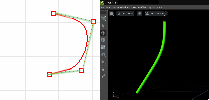
|
UV Interp Type |
Uniform |
UV interpolation Type Uniform is usd texture primvars setting that sets texture coordinate to texCoord2f[] primvars:st1 per curve strand from Root. Example - 1 hair strand consist with 4 vertex will have texCoord2f[] count of 1. 
|
UV Interp Type |
Vertex |
USD texture primvars setting that sets texture coordinate to texCoord2f[] primvars:st1 per vertex inherited from Root. Example - 1 hair stand consist with 4 vertex will have texCoord2f[] count of 4. .. figure:: /images/connect_maya_hair_interp_vertex.png |
Note
Known Limitation - Hair Groom cannot be exported with Animation or as animation clip.
To export an xgen groom, first be sure there is an xgen groom in the maya scene.
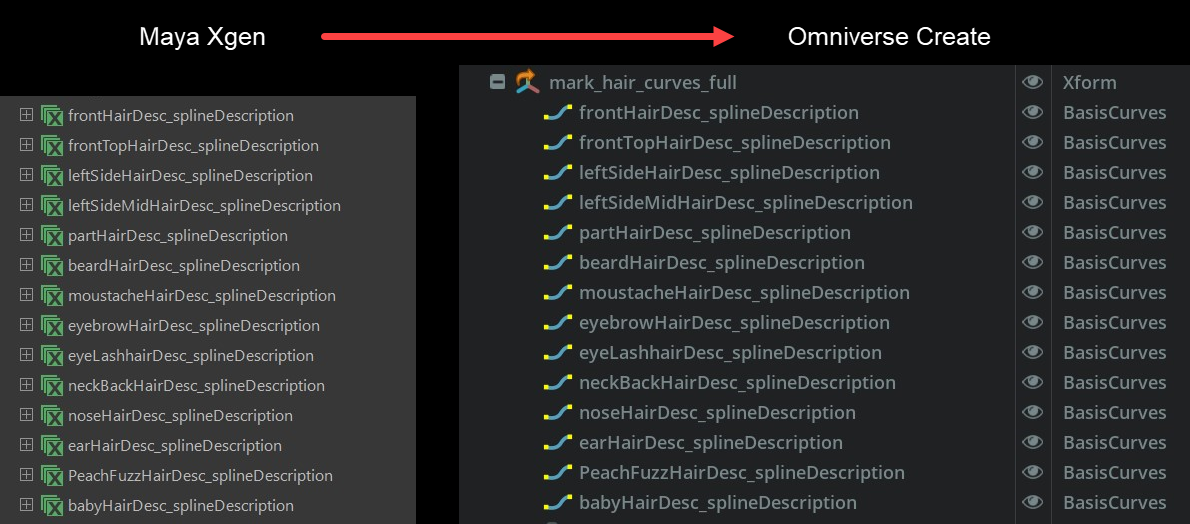
Convert to an Interactive Groom
Upon Export Choose Prop and the settings as listed above.
Open usd file in Create
Set hair Material UV index to 1.
For additional grooms, use export selected.
Then reference additional groom to the USD stage.

Scripting#
Warning
The Maya Legacy Connector is no longer supported. All users should move to Maya Native.
USD Python Binding#
USD Python Bindings are available with the installation of the Maya Omniverse Connector.
Note
Known Limitation - Other USD plugins must be uninstalled for this to work.
Maya Plugin Script APIs#
Loading the Plugin#
Besides loading the Maya Omniverse plugin via the Plugin manager dialog, users can also load the plugin via this script.
loadPlugin "OmniverseMayaLoader.mll"
Connect to an Omniverse Server#
Check Connection Status#
int $nvConnect = `optionVar -q omniverse_connection_state`;
The omniverse_connection_state is a Maya option variable. You can remove it with the following command.
optionVar -remove omniverse_connection_state;
And you can modify it with this command
optionVar -iv omniverse_connection_state 1;
Note
Generally speaking, Users should use string or integer types for option variables as Maya does not use boolean variables.
OmniExtraCmd - clientLogLevel 0;

0 - Debug
1 - Verbose
2 - Inform
3 - Warning
4 - Error
Set User Name and Log in#
To make sure that you log in to right server you can call the following script command step by step.
Set up user name:
optionVar -sv "omniverse_user_name_var" dduka;
Set up available servers#
Creates a list of servers to connect to.
optionVar -sv omniverse_server_urls "localhost:3009;my-server:1234;my-other-server:4321"
Set Up Current Server#
Set’s up the server you wish to log-in to.
optionVar -sw omniverse_server_url "my-server:1234";
Inform C++ Plugin#
Script command to make the C++ plugin get the above information.
OmniConfigCmd;
Connect to Server#
Makes the connection to an Omniverse Nucleus Server.
OmniConnectionCmd true;
Update Status#
Make the relative UI showing correct status after log-in.
nvOmniUpdateConnectionMenu();
nvOmniUpdateConnectionUI();
Export USD#
Export a USD to Omniverse
OmniExportCmd -file "/Example/Users/aatest/tt.usd";
Note
there is a prefix “/Omniverse” with the URL.
Setting up Export Mode types#
Optional variables control how you export a scene. As an export can take form in various ways, you need turn on/off some variables before calling the export command.
Prop#
optionVar -iv omniverse_export_objecttype 1;
Skeletal Mesh#
optionVar -iv omniverse_export_objecttype 2;
optionVar -iv omniverse_export_skip_skelanimation 1
This option allows you to choose if 1 frame of animation is set to USD Skel on export. It is off by default.
Point Cache#
optionVar -iv omniverse_export_objecttype 3;
Set Export Collection Types
Export/Live-Sync All#
optionVar -iv omniverse_export_collectiontype 1;
Export/Live-Sync Selected#
optionVar -iv omniverse_export_collectiontype 2;
Export/Live-Sync Visible#
optionVar -iv omniverse_export_collectiontype 3;
Always Export GeomSubsets#
optionVar -iv omni_always_export_geosubset 0;
optionVar -iv omni_always_export_geosubset 1;
Other exporting options:#
Turn on “Use Animation”#
optionVar -iv omniverse_export_useanimation 1;
Set Animation Start-Frame#
optionVar -iv omniverse_export_ani_start 1;
Set Animation End-Frame#
optionVar -iv omniverse_export_ani_end 200;
Set Animation step#
optionVar -iv omniverse_export_ani_stride 1;
Normalize Animation range#
This option renumbers the exported frame range starting from a given base number. It will also adjust the timecode of the usd file to reflect the range.
NormalizeFrameRangeOnExport -onflag true -basenumber 0;
Normalize Skin Weights#
optionVar -iv omniverse_export_normalizeskinweights 1;
Bake Skin Bind position#
optionVar -iv omniverse_skin_use_finalmesh 0;
Include MDL#
optionVar -iv omniverse_export_includemdl 1;
Embedded MDL option#
optionVar -iv omniverse_embed_materials 1;
Include Cameras#
optionVar -iv omniverse_export_includecamera 1;
Include Lights#
optionVar -iv omniverse_export_includelight 1;
Live Sync Commands#
For Live Sync, it cannot work with USD Animation on. So, you need run two script commands to turn it on.
optionVar -iv omniverse_export_useanimation 0; // turn off Use Animation
optionVar -iv omniverse_export_livesync 1; // turn on Live Sync
nvOmniUpdateConnectionUI(); // this is optional. But if you want to see right Live Sync checkbox status, you need call it.
Import USD#
Imports a USD file on Omniverse
OmniImportCmd -file "/Omniverse/Users/aatest/tt.usd";
Note
there is a prefix “/Omniverse” to the URL.
List Command#
List Command can be used to list the files and sub-folders in an Omniverse folder. The return value of this command is a string array which has data grouped by 3.
string $ffs[] = `OmniListCmd -la "/Omniverse/Users/aatest/"`;
Note
the string should end with ‘/’ as well as starts with the prefix ‘/Omniverse
Show File/Folder Name#
Shows each folder/file full name
int $m = 0; for($m = 0; $m < 3; $m++) { int $idx = $m * 3; print ($ffs[$idx] + "\n");}
Show Folder/File Modify Date#
int $m = 0; for($m = 0; $m < 3; $m++) { int $idx = $m * 3 + 1; print ($ffs[$idx] + "\n");}
Cache#
Check Cache Status#
maya.cmds.optionVar(q='OmniAuth_enableCaching')
Enable Caching#
maya.mel.eval('OmniEnableCachingCmd -enable 1')
Plugin Load Time#
maya.mel.eval('OmniExtaCmd -tl')
t = maya.cmds.OmniExtaCmd(tl=True)
print t
MDL Materials#
Python Scripts relating to MDLs
List MDL Materials#
Python Script to show all of MDL materials
import maya.cmds as cmds
mdls = cmds.mdlShaderCmd(q=True,listHyperShadeItems=True)
for module in mdls:
    print module
Result
[u'adobe::annotations',
u'adobe::convert',
u'adobe::mtl',
......
u'Users::kkantiev::Hardskin_Test::t1OmniPbrTest',
u'Users::lileo::Maya::initialShadingGroup_lambert',
u'Users::lileo::Maya::lambert1']
Alternative List MDL#
mdls = cmds.mdlShaderCmd(q=True,listHyperShadeItems=True)
Result .. code-block:: python
[u’L/Library/MDL/Base/OmniGlass/OmniGlass’, u’L/Library/MDL/Base/OmniPBR/OmniPBR’, u’L/Library/MDL/Base/OmniPBR_Opacity/OmniPBR_Opacity’]
Upgrade MDL Materials#
Warning
This feature is deprecated in upcoming releases as it is not needed any longer. This tool specifically addresses a material change that was done from 2019.2 to 2019.3. The menu entry has been removed, however is still available as a MEL script command if needed.
nvOmniMenuUpgradeMaterials_command().
Record Time#
Record Time of Server Connect and Load#
maya.cmds.timer(s=True);
maya.mel.eval('optionVar -sv "omniverse_user_name_var" "my-user-name"')
maya.mel.eval('optionVar -sv "omniverse_server_url" "my-server:1234"')
maya.mel.eval('nvOmniMainConnectivity')
t = maya.cmds.timer(e=True);
print t
Record time to load templates#
maya.cmds.timer(s=True);
maya.mel.eval('optionVar -sv "Omniverse_Library_Materials_Templates_SearchPaths" "/Omniverse/Library/Materials/Templates;"')
maya.mel.eval('syncMDLSearchPath')
t = maya.cmds.timer(e=True);
print t
Record time to load Collection#
Collection Path is supported the same way as template path in plugin. So, there is should be no difference. But adding more path should cost more time.
maya.cmds.timer(s=True);
maya.mel.eval('optionVar -sv "Omniverse_Library_Materials_Collections_SearchPaths" "/Omniverse/Users/aatest/ani;"')
maya.mel.eval('syncMDLSearchPath')
t = maya.cmds.timer(e=True);
print t
Pick one file name#
User may want to pick and get a file name without exporting or importing a USD. Here the things to do. You need define a mel function nvOmniPickCallback in which you define what you do with the file name. Now you can call mel function nvOmniPickAFile() to start the file pick dialog. Once you pick a file and close the dialog, nvOmniPickCallback is called.
global proc nvOmniPickCallback(string $filename)
{
   print("nvOmniPickCallback " + $filename + "\n");
}
nvOmniPickCallback is read only. You may want to export a new USD. Then you can call nvOmniAddAFile(). And you also need define a call back function, nvOmniAddAFileCallback, to handle the file name.
global proc nvOmniAddAFileCallback(string $filename)
{
   print("nvOmniAddAFileCallback " + $filename + "\n");
   OmniExportCmd -file $filename;
}
Loading the Plug-In#

Once the Maya Omniverse plugin is installed, navigate to the Plug-in Manager.
(Windows > Settings/Preferences > Plug-in Manager)
Look for OmniverseMayaLoader.mll and load/verify the plugin is loaded/working. Select auto load if Maya should load this plugin automatically.
Live Workflow#
Warning
The Maya Legacy Connector is no longer supported. All users should move to Maya Native.
To Live sync with Maya, turn on the Live toggle on the Omniverse shelf. When a Live sync session is enabled, changes to the scene in Maya are sent to Omniverse, as well as receiving changes to the file from Omniverse.
When Live syncing a file, the most recent settings on the Export panel are honored. For example, if you had cameras and light toggled off and then then toggled on Live sync with a USD file that has cameras and lights, the cameras and lights would not subscribe to Live sync.
For more information on Live Workflows, visit OmniLive
Warning
Live is disabled if the target USD has animation or a different up axis than the Maya file. Duplicating a prim may not retain the prepend information, payload, or reference, if used. This may result in incorrect or heavy mesh information in the USD stage.
Maya Live Sync with Skeletal Mesh#
Live Sync Limitations#
In some cases Materials will appear to not Live Sync, depending on when the viewport textures (checker ball icon) are turned on. To reduce the issue, turn on viewport textures once you open the USD file; otherwise materials loaded before this is turned on will not sync properly.
