Build a Scatter Tool#
In this tutorial, you learn how to create a scatter tool that can randomize prims around the world space. You create a tool that can scatter on X, Y, and Z axes by the amount of objects, their distance, and their random count. This tutorial is well suited for intermediate engineers.
Learning Objectives#
Use the Omniverse UI framework.
Add an Extension from your local path.
Set scatter properties.
Analyze a random number generator.
Use the USD API to set up a
PointInstancer.Understand the undo function.
Prerequisites#
Before you begin, install Omniverse Code version 2022.1.2 or higher.
We recommend that you get familiar with the following links before proceeding:
Step 1: Install the Starter Project Extension#
In this section, you download our sample Extension project and install it in Omniverse Code.
Step 1.1: Download the Scatter Project#
Clone the tutorial-start branch of the kit-extension-sample-scatter GitHub repository:
git clone -b tutorial-start https://github.com/NVIDIA-Omniverse/kit-extension-sample-scatter.git
This repository contains the assets you use in this tutorial.
Step 1.2: Open the Extensions Tab#
In Omniverse Code, click the Extensions tab:
Note
If you don’t see the Extensions panel, enable Window > Extensions
Step 1.3: Add the Extension From Your Local Path#
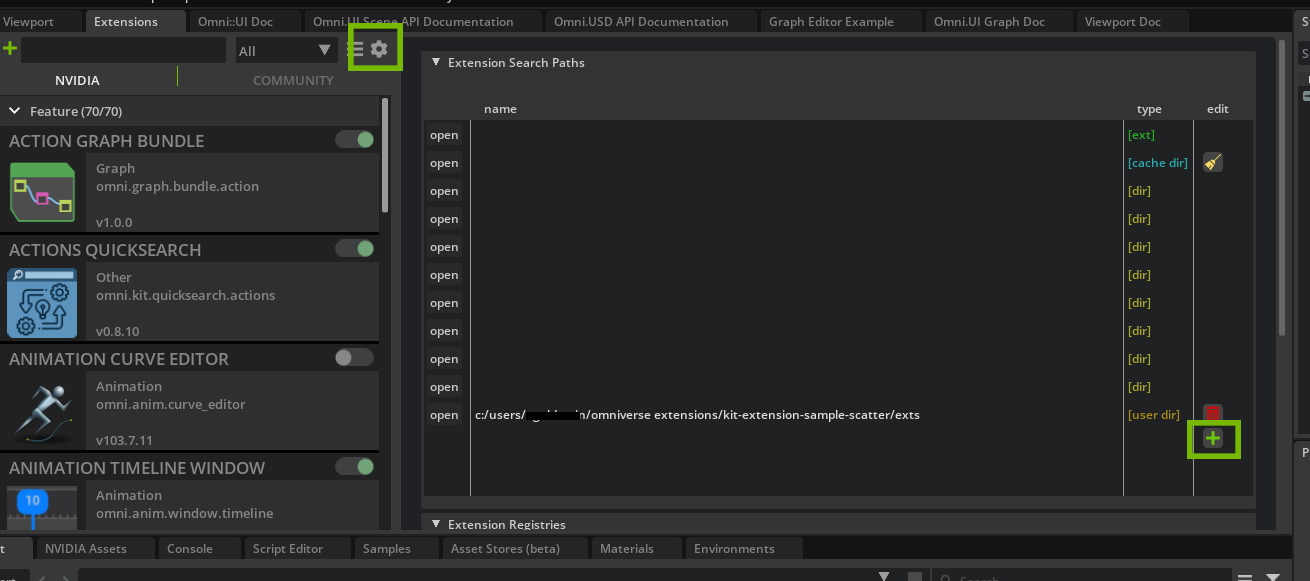
In the Extensions tab, click the gear icon to open Extension Search Paths. Then, click the green plus icon to add a new path. Finally, copy and paste the local path of the exts folder from the tutorial-start branch:

Here, you imported the extension into the Extension Manager in Omniverse Code by adding the local path of the tutorial-start branch you cloned from our GitHub repository.
Step 1.4: Activate Your New Extension#
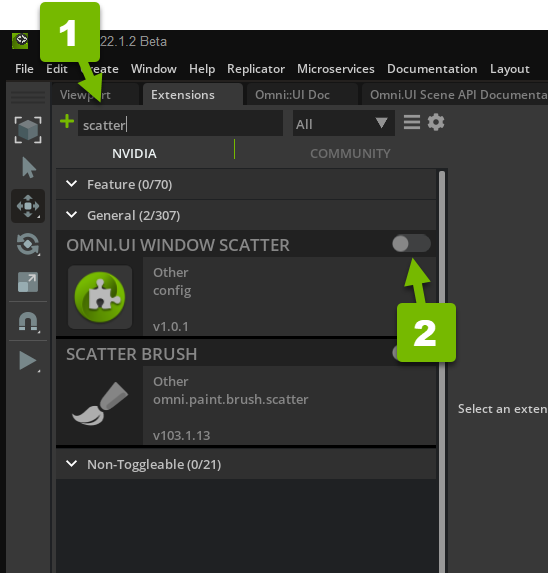
Type “scatter” into the search box at the top of the Extensions list, and activate the OMNI.UI WINDOW SCATTER Extension:

Now that your Extension is imported and active, you can make changes to the code and see them in your Application.
Step 2: Implement _build_source()#
This tutorial starts with a blank Scatter Window. In the following steps, you learn to use Omniverse UI Framework to build the window’s user interface (UI).
Step 2.2: Create a Collapsible Frame#
Create a CollapsableFrame in _build_source() as the first component of your UI:
def _build_source(self):
    """Build the widgets of the "Source" group"""
    # Create frame
    with ui.CollapsableFrame("Source", name="group"):
_build_source() creates a place to display the source path of the prim you want to scatter. Here, you added a CollapsableFrame, which is a frame widget from Omniverse UI Framework that can hide or show its content.
Step 2.3: Lay Out Your Frame#
Use a VStack to create a column and an HStack to create a row:
def _build_source(self):
    """Build the widgets of the "Source" group"""
    # Create frame
    with ui.CollapsableFrame("Source", name="group"):
        # Create column
        with ui.VStack(height=0, spacing=SPACING):
            # Create row
            with ui.HStack():
The VStack is a vertical stack container that holds one HStack, a horizontal stack container.
Step 2.4: Create and Name an Input Field#
Create a Label and a StringField:
def _build_source(self):
    """Build the widgets of the "Source" group"""
    # Create frame
    with ui.CollapsableFrame("Source", name="group"):
        # Create column
        with ui.VStack(height=0, spacing=SPACING):
            # Create row
            with ui.HStack():
                # Give name of field
                ui.Label("Prim", name="attribute_name", width=self.label_width)
                ui.StringField(model=self._source_prim_model)
The StringField is an input field that accepts the prim. The Label, called “Prim”, describes the field to your users.
Step 2.5: Populate Your Field#
Add a Button that takes the user’s current selection and populates the StringField:
def _build_source(self):
    """Build the widgets of the "Source" group"""
    # Create frame
    with ui.CollapsableFrame("Source", name="group"):
        with ui.VStack(height=0, spacing=SPACING):
            with ui.HStack():
                # Give name of field
                ui.Label("Prim", name="attribute_name", width=self.label_width)
                ui.StringField(model=self._source_prim_model)
                # Button that puts the selection to the string field
                ui.Button(
                    " S ",
                    width=0,
                    height=0,
                    style={"margin": 0},
                    clicked_fn=self._on_get_selection,
                    tooltip="Get From Selection",
                )
This Button, labeled “S”, places the prim selection in the StringField.
Step 3: Implement _build_scatter()#
Now that you’ve built functionality that selects a source prim to scatter, you need to implement _build_scatter(). ### Step 3.1: Create a Collapsible Frame
Start your _build_scatter() interface with a CollapsableFrame:
def _build_scatter(self):
  """Build the widgets of the "Scatter" group"""
  with ui.CollapsableFrame("Scatter", name="group"):
Step 3.2: Lay Out Your Frame#
Create one column with three rows, each with a Label and an input:
def _build_scatter(self):
    """Build the widgets of the "Scatter" group"""
    with ui.CollapsableFrame("Scatter", name="group"):
        # Column
        with ui.VStack(height=0, spacing=SPACING):
            # Row
            with ui.HStack():
                ui.Label("Prim Path", name="attribute_name", width=self.label_width)
                ui.StringField(model=self._scatter_prim_model)

            # Row
            with ui.HStack():
                ui.Label("Prim Type", name="attribute_name", width=self.label_width)
                ui.ComboBox(self._scatter_type_model)

            # Row
            with ui.HStack():
                ui.Label("Seed", name="attribute_name", width=self.label_width)
                ui.IntDrag(model=self._scatter_seed_model, min=0, max=10000)
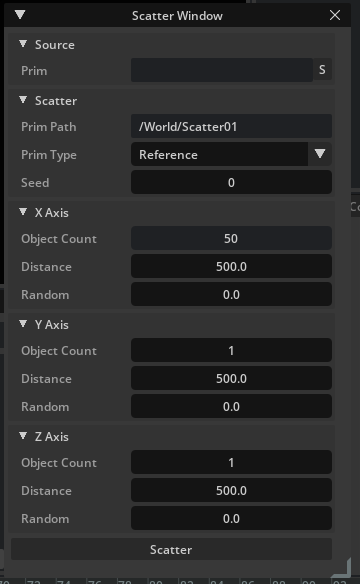
Like before, you’ve created a layout with VStack and HStack, but this time, your column includes three rows. Each row has a Label and an input. The first row is labeled “Prim Path” and accepts a string. The second row is labeled “Prim Type” and accepts a ComboBox selection. The third row is labeled “Seed” and accepts the result of an integer drag widget.
Step 4: Implement _build_axis()#
Implement the _build_axis() UI to set the scatter parameters on the X, Y, and Z axes.
Step 4.1: Lay Out Your Frame#
In _build_axis(), establish a structure similar to _build_scatter(), with a Collapsible Frame, one column, and three rows:
def _build_axis(self, axis_id, axis_name):
    """Build the widgets of the "X" or "Y" or "Z" group"""
    with ui.CollapsableFrame(axis_name, name="group"):
        # Column
        with ui.VStack(height=0, spacing=SPACING):
            # Row
            with ui.HStack():
                ui.Label("Object Count", name="attribute_name", width=self.label_width)
                ui.IntDrag(model=self._scatter_count_models[axis_id], min=1, max=100)

            # Row
            with ui.HStack():
                ui.Label("Distance", name="attribute_name", width=self.label_width)
                ui.FloatDrag(self._scatter_distance_models[axis_id], min=0, max=10000)

            # Row
            with ui.HStack():
                ui.Label("Random", name="attribute_name", width=self.label_width)
                ui.FloatDrag(self._scatter_random_models[axis_id], min=0, max=10000)
Like with _build_scatter(), each row has a Label and an input. This time, the first row is labeled “Object Count” and accepts the result of an integer drag widget. The second row is labeled “Distance” and accepts the results of a FloatDrag widget. The third row is labeled “Random” and also accepts the results of a FloatDrag widget.
Even though there are three axes on which you want to scatter your prim, you only need one function, since you can reuse it for each axis.
Step 5: Implement _build_fn()#
Now that you’ve established the user interface for the Scatter Window in a collection of functions, you implement _build_fn(), which calls those functions and draws their UIs to the screen.
Step 5.1: Lay Out Your Frame#
In _build_fn(), lay out a ScrollingFrame with a single column composed of your previously-built UIs:
def _build_fn(self):
    """
    The method that is called to build all the UI once the window is
    visible.
    """
    # Frame
    with ui.ScrollingFrame():
        # Column
        with ui.VStack(height=0):
            # Build it
            self._build_source()
            self._build_scatter()
            self._build_axis(0, "X Axis")
            self._build_axis(1, "Y Axis")
            self._build_axis(2, "Z Axis")

            # The Go button
            ui.Button("Scatter", clicked_fn=self._on_scatter)
Here, you used ScrollingFrame instead of CollapsableFrame so that the frame can scroll to accommodate all the UIs. In your VStack, you call all of your UI build functions in sequence to establish a visual hierarchy. You call _build_axis() three times with arguments that identify the axis it represents. Finally, you add a Scatter button that scatters the selected prim.
Step 5.2: Review Your Work#
In Omniverse Code, review your Scatter Window:

Note
If you don’t see your changes to the window, try deactivating and reactivating the Extension:

Step 6: Implement _on_scatter()#
In this step, you implement_on_scatter(), which scatters the prim
when the Scatter button is clicked.
Step 6.1: Implement the Scatter Logic#
Implement the logic to scatter the selected prims:
def _on_scatter(self):
    """Called when the user presses the "Scatter" button"""
    prim_names = [i.strip() for i in self._source_prim_model.as_string.split(",")]
    if not prim_names:
        prim_names = get_selection()

    if not prim_names:
        pass

    transforms = scatter(
        count=[m.as_int for m in self._scatter_count_models],
        distance=[m.as_float for m in self._scatter_distance_models],
        randomization=[m.as_float for m in self._scatter_random_models],
        id_count=len(prim_names),
        seed=self._scatter_seed_model.as_int,
    )

    duplicate_prims(
        transforms=transforms,
        prim_names=prim_names,
        target_path=self._scatter_prim_model.as_string,
        mode=self._scatter_type_model.get_current_item().as_string,
    )
We defined prim_names in the sample code. You got the scatter properties from the models and passed them to duplicate_prims(), which scatters the prims for you.
Optional Challenge: While we provide some arrays and loops for the properties, we encourage you to experiment with your own.
Step 6.2: Review Your Work#
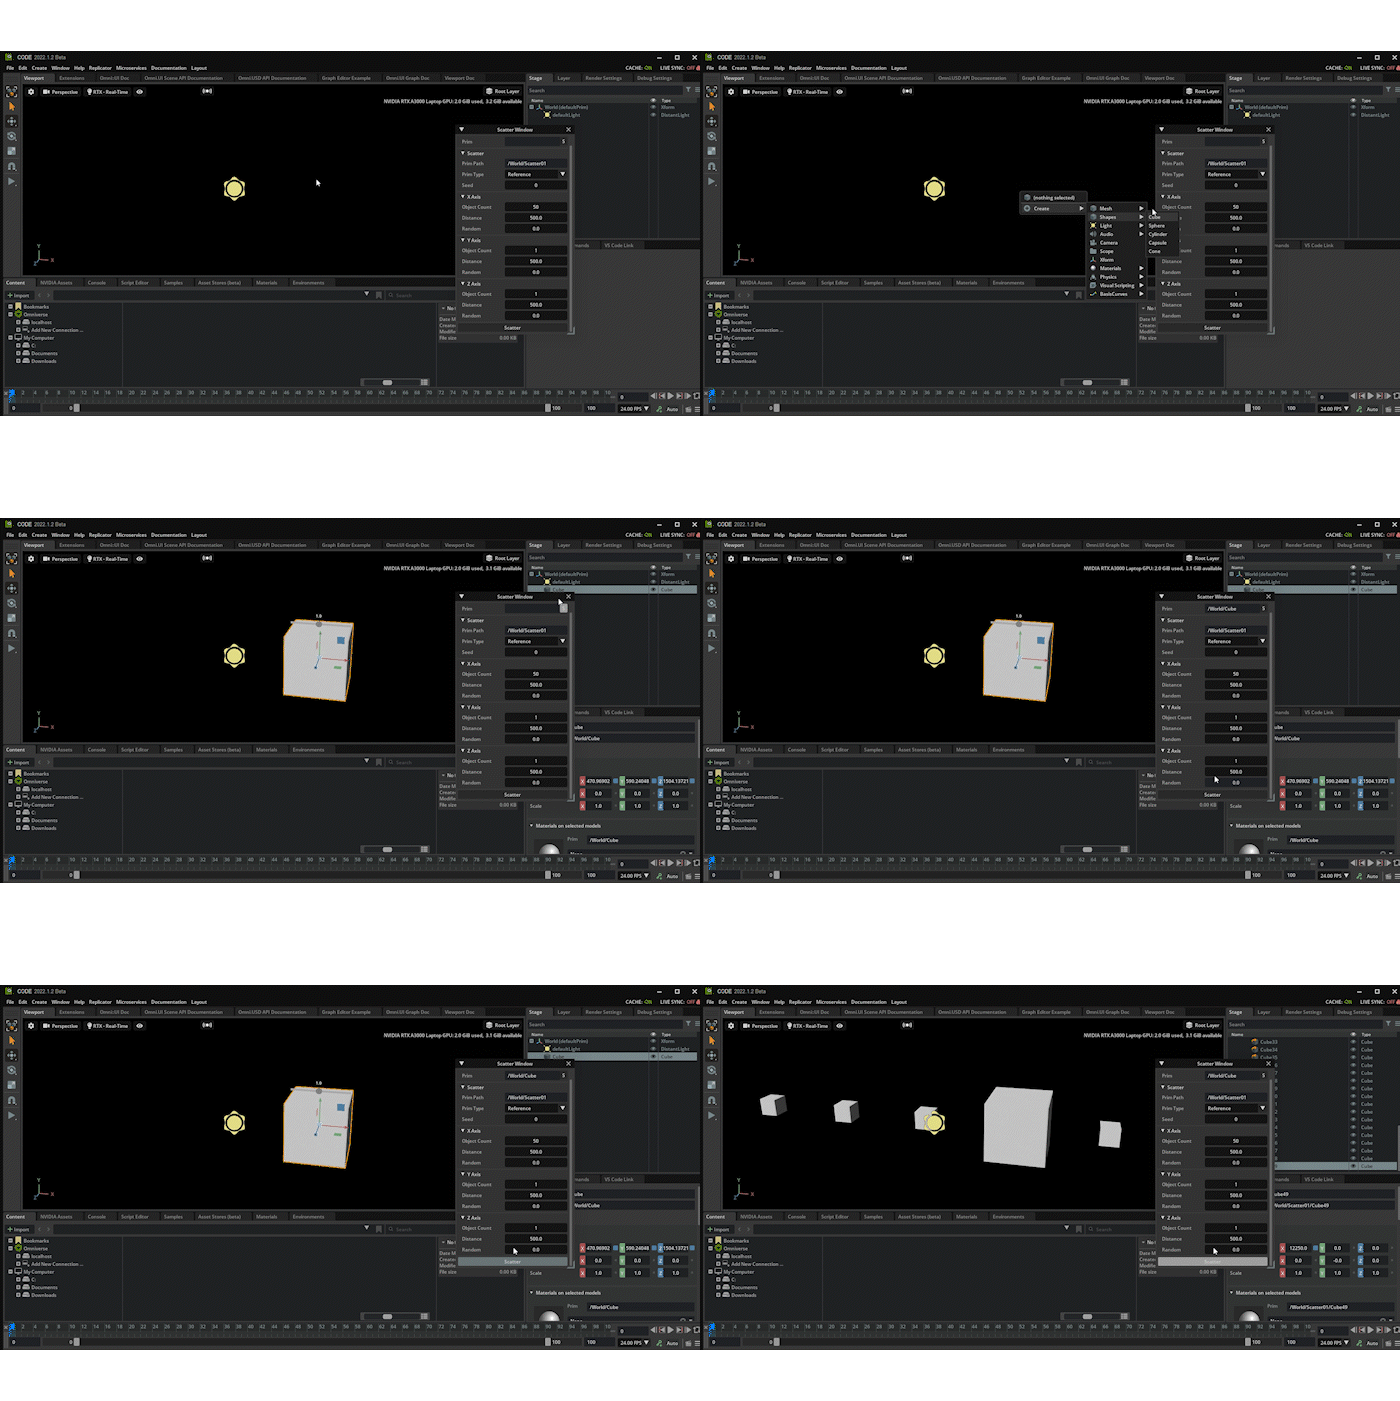
In your Scatter Window, click Scatter:

Your prim scatters using the properties set above.
Congratulations#
Great job completing this tutorial! Interested in learning more about the ins and outs of the code? Continue reading.
Further Reading: Understanding scatter.py#
This section introduces scatter.py and briefly showcases its function in the scatter tool.
Navigate to scatter.py in your exts folder hierarchy. This script is where on_scatter() in window.py pulls its information from. Notice the following arguments in scatter.py`:
def scatter(
    count: List[int], distance: List[float], randomization: List[float], id_count: int = 1, seed: Optional[int] = None
):
...
These arguments match up with the properties in transforms from the previous step of on_scatter.
The docstring below provides a description for each parameter, and returns generator with pairs containing transform matrices and ids to arrange multiple objects:
### Arguments:
 `count: List[int]`
     # Number of matrices to generate per axis
 `distance: List[float]`
     # The distance between objects per axis
 `randomization: List[float]`
     # Random distance per axis
 `id_count: int`
     # Count of different id
 `seed: int`
     # If seed is omitted or None, the current system time is used. If seed
     # is an int, it is used directly.
Below this comment is where the loop is initialized to randomly generated a sets of points as well as create a matrix with position randomization for each axis:
# Initialize the random number generator.
random.seed(seed)

for i in range(count[0]):
    x = (i - 0.5 * (count[0] - 1)) * distance[0]

    for j in range(count[1]):
        y = (j - 0.5 * (count[1] - 1)) * distance[1]

        for k in range(count[2]):
            z = (k - 0.5 * (count[2] - 1)) * distance[2]

            # Create a matrix with position randomization
            result = Gf.Matrix4d(1)
            result.SetTranslate(
                Gf.Vec3d(
                    x + random.random() * randomization[0],
                    y + random.random() * randomization[1],
                    z + random.random() * randomization[2],
                )
            )

            id = int(random.random() * id_count)

            yield (result, id)
scatter.py is where you can adjust to create different types of scatters, such as scatter on the geometry or a scatter that uses texture.
Further Reading: Understanding command.py#
This section introduces command.py and briefly showcases its function in the scatter tool.
Navigate to command.py in the exts folder, and review what’s inside. At the start of the ScatterCreatePointInstancerCommand class, the docstring provides descriptions for each of the parameters:
Create PointInstancer undoable Command.
### Arguments:

 `path_to: str`
     # The path for the new prims
 `transforms: List`
     # Pairs containing transform matrices and ids to apply to new objects
 `prim_names: List[str]`
     # Prims to duplicate
Below the comment is where these arguments are initialized, sets the USD stage, and unzips the list of tuples:
def __init__(
    self,
    path_to: str,
    transforms: List[Tuple[Gf.Matrix4d, int]],
    prim_names: List[str],
    stage: Optional[Usd.Stage] = None,
    context_name: Optional[str] = None,
):
    omni.usd.commands.stage_helper.UsdStageHelper.__init__(self, stage, context_name)
    self._path_to = path_to

    # We have it like [(tr, id), (tr, id), ...]
    # It will be transformed to [[tr, tr, ...], [id, id, ...]]
    unzipped = list(zip(*transforms))

    self._positions = [m.ExtractTranslation() for m in unzipped[0]]
    self._proto_indices = unzipped[1]
    self._prim_names = prim_names.copy()
Following that, the PointInstancer command is set up. This where the USD API is used to create the geometry and create the points during
scatter.
def do(self):
    stage = self._get_stage()

    # Set up PointInstancer
    instancer = UsdGeom.PointInstancer.Define(stage, Sdf.Path(self._path_to))
    attr = instancer.CreatePrototypesRel()
    for name in self._prim_names:
        attr.AddTarget(Sdf.Path(name))
    instancer.CreatePositionsAttr().Set(self._positions)
    instancer.CreateProtoIndicesAttr().Set(self._proto_indices)
Finally, the undo() function is defined. This is called when the user undoes the scatter to restore the prior state of the stage. In this case, the state is restored by simply deleting the PointInstancer. The reason delete_cmd.do() is used rather than calling omni.kit.commands.execute() is so that the “DeletePrimsCommand” doesn’t show up in the Commands History.
def undo(self):
    delete_cmd = omni.usd.commands.DeletePrimsCommand([self._path_to])
    delete_cmd.do()